As already answered, the simplest solution is to just add one of the following as your RecyclerView row's background:
android:background="?android:attr/selectableItemBackground"android:background="?attr/selectableItemBackground"
However if you are experiencing problems with this method or if you want finer control over the colors, then you can do the following.
Custom Ripple Effect
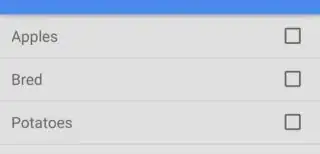
This answer is starting with this simple Android RecyclerView example. It will look like the following image.
Add selector for pre API 21 devices
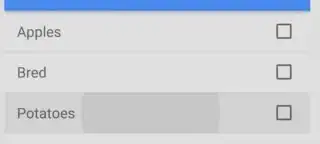
Before API 21 (Android 5.0 Lollipop), clicking a RecyclerView item just changed its background color (no ripple effect). That is what we are going to do, too. If you still have users with those devices, they are used to that behavior, so we aren't going to worry about them too much. (Of course, if you really want the ripple effect for them, too, you could use a custom library.)
Right click your res/drawable folder and choose New > Drawable resource file. Call it custom_ripple. Click OK and paste in the following code.
custom_ripple.xml
<?xml version="1.0" encoding="utf-8"?>
<selector xmlns:android="http://schemas.android.com/apk/res/android">
    <item android:state_pressed="true">
        <shape android:shape="rectangle">
            <solid android:color="@color/colorAccent" />
        </shape>
    </item>
    <item>
        <shape android:shape="rectangle">
            <solid android:color="@android:color/transparent" />
        </shape>
    </item>
</selector>
I used colorAccent as the highlight color for the pressed state because it was already available, but you can define whatever color you want.
Add Ripple Effect for API 21+ devices
Right click your res/drawable folder and choose New > Drawable resource file. Call it custom_ripple again. Don't click OK, yet this time, though. From the Available qualifiers list choose Version, then click the >> button and write 21 for the Platform API level. Now click OK and paste in the following code.
v21/custom_ripple.xml
<?xml version="1.0" encoding="utf-8"?>
<ripple xmlns:android="http://schemas.android.com/apk/res/android"
    android:color="@color/colorAccent">

    <item
        android:id="@android:id/mask"
        android:drawable="@android:color/white" />
</ripple>
Again, I used colorAccent for the ripple color because it was available, but you can use whatever color you want. The mask confines the ripple effect to just the row layout. The mask color apparently doesn't matter so I just used an opaque white.
Set as the background
In your RecyclerView item's root layout, set the background to the custom ripple that we created.
android:background="@drawable/custom_ripple"
In the example project that we started with, it looks like this:
<?xml version="1.0" encoding="utf-8"?>
<LinearLayout
    xmlns:android="http://schemas.android.com/apk/res/android"
    android:layout_width="match_parent"
    android:layout_height="wrap_content"
    android:orientation="horizontal"
    android:background="@drawable/custom_ripple"
    android:padding="10dp">

    <TextView
        android:id="@+id/tvAnimalName"
        android:layout_width="wrap_content"
        android:layout_height="wrap_content"
        android:textSize="20sp"/>

</LinearLayout>
Finished
That's it. You should be able to run your project now. Thanks to this answer and this YouTube video for help.