1/23/19 UPDATE:
Things have changed quite a bit (for the better) since my last answer. This updated answer will show you how to configure:
- Root apex (example.com)
- Sub-domain (www.example.com)
- HTTPS (optional but strongly encouraged)
In the end, all requests to example.com will be re-directed to https://www.example.com (or http:// if you choose NOT to use HTTPS). I always use www as my final landing. Why(1,2), is for another discussion.
This answer is long but it is not complicated. I was verbose for clarity as the GitHub docs on this topic are not clear or linear.
Step 1: Enable GitHub pages in GitHub settings
- From your repo, click on the
 tab
tab
- Scroll down to the
GitHub Pages section. You have two options: 
- Choosing
master branch will treat /README.md as your web index.html. Choosing master branch /docs folder will treat /docs/README.md as your web index.html.
- Choose a theme.
- Wait a minute while GitHub publishes your site. Verify it works by clicking on the link next to
Your site is ready to be published at
Step 2: Specify custom domain in GitHub settings
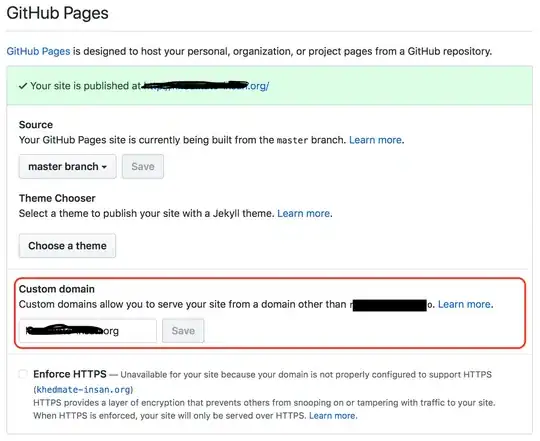
Enter your custom domain name here and hit save:

This is a subtle, but important step.
- If the custom domain you added to your GitHub Pages site is
example.com, then www.example.com will redirect to example.com
- If the custom domain you added to your GitHub Pages site is
www.example.com, then example.com will redirect to www.example.com.
As mentioned before, I recommend always landing at www so I entered www.example.com as pictured above.
Step 3: Create DNS entries
In your DNS provider's web console, create four A records and one CNAME.
A Records for @ (aka root apex):
Some DNS providers will have you specify @, others (like AWS Route 53) you will leave the sub-domain blank to indicate @. In either case, these are the A records to create:
185.199.108.153
185.199.109.153
185.199.110.153
185.199.111.153
Check the Github docs to confirm these are the most up-to-date IPs.
- Create a
CNAME record to point www.example.com to YOUR-GITHUB-USERNAME.github.io.
This is the most confusing part.
Note the YOUR-GITHUB-USERNAME NOT the GitHub repo name! The value of YOUR-GITHUB-USERNAME is determined by this chart.
For a User pages site (most likely what you are), CNAME entry will be username.github.io, ex:
For a Organization pages site, CNAME entry will be orgname.github.io, ex:

Step 5: Confirm DNS entries
Confirm your A records by running dig +noall +answer example.com. It should return the four 185.x.x.x IP addresses you entered.
Confirm your CNAME record by running dig www.example.com +nostats +nocomments +nocmd. It should return a CNAME YOUR-GITHUB-USERNAME.github.io
It may take an hour or so for these DNS entries to resolve/propagate. Once they do, open up your browser to http://example.com and it should re-direct to http://www.example.com
Step 6: SSL (HTTPS) Configuration. Optional, but highly recommended
After you have the custom domain working, go back to the repo settings. If you already have the settings page open, hard refresh the page.
If there is a message under the Enforce HTTPS checkbox, stating that it is still processing you will need to wait. You may also need to hit the save button in the Custom domain section to kick off the Enforce HTTPS processing.
Once processing is completed, it should look like this:
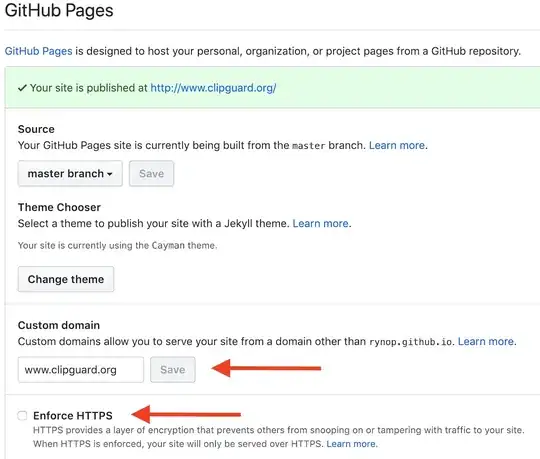
Just click on the Enforce HTTPS checkbox, and point your browser to https://example.com. It should re-direct and open https://www.example.com
THATS IT!
GitHub will automatically keep your HTTPS cert up-to-date AND should handle the apex to www redirect over HTTPS.


