17

I'm currently having a problem where my computers B and C can access computer A by name (ie. \\computerA), but computer D cannot use the name.

Computer D can only access A through its IP address (ie. \\192.168.0.xxx).

Computer D is using Windows 10 and A is using Windows XP.

This isn't a huge problem, but I would like to solve it and use computer name always.

Giacomo1968
  • 58,727

7 Answers7

13

You should double check that your Network Discovery is enabled. Here are the steps to turn it on (based on Windows 10):

  1. Go to Control Panel by opening Advanced sharing settings (from Start button).
  2. Type network and open Network and Sharing Center and select Change advanced sharing settings.
  3. Turn on network discovery and Save changes.

See: What is network discovery?

It is also important, when you connect to the network, to choose type of Network location such as: Home, Work, Public, and Domain. Based on this, Windows assigns a network discovery state and appropriate configure your Windows Firewall ports for that state.

Preferably choose Home location, where Network discovery is turned on, which allows you to see other computers and devices and allows other network users to see your computer on the network.

You can change your location, by choosing option in Network and Sharing Center (either Work network, Home network, or Public network).
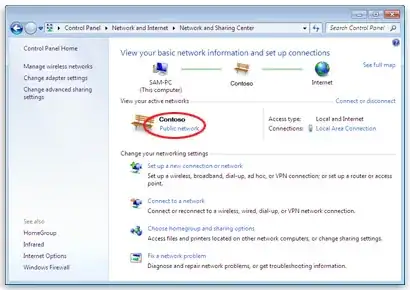
Network and Sharing Center - Click Work network, Home network, or Public network, and then click the network location you want

See: Choosing a network location

If your computer is visible through \\192.168.0.xxx), then your local network should work, so maybe you just need to re-login to the right Workgroup. If it's all about the name discovery, you should check if your broadcasting IP address matches.


Troubleshooting

In case this still doesn't work, check that:

  • you've disabled any other firewall (for testing purposes, disable temporary your anti-virus),
  • your computer responds to pings from other computers, e.g. in command line (change IP into your relevant computer IPs):

    ping 192.168.0.2
    ping 192.168.0.3
    
  • you're connected to the same network,

  • your IP is within the same range (and your network mask matches),

    This is required for broadcast packets being send to the same broadcasting IP address (e.g. 192.168.255.255).

    All computers must be on the same local network or subnet.

  • computers are within the same workgroup and homegroup (could be not mandatory),

  • check if your computer has file sharing ports open (ports 139 and 445), e.g.

    telnet 192.168.0.xxx 139
    telnet 192.168.0.xxx 445
    

    If telnet is missing, install it via (run as admin):

    dism /online /Enable-Feature /FeatureName:TelnetClient
    
  • you've CIFS File Sharing Support enabled in Windows Features

  • re-login or restart your computer, so your computer can logs into local network
kenorb
  • 26,615
4

A solution that worked for me was to:

Add the IP and shared name to the client host file. For example:

192.168.0.100 server

Or as a batch file (run as admin)

@echo off

SET NEWLINE=^& echo.

FIND /C /I "servername" %WINDIR%\system32\drivers\etc\hosts

IF %ERRORLEVEL% NEQ 0 ECHO %NEWLINE%^ 192.168.1.100 server>>%WINDIR%\System32\drivers\etc\hosts

Rem the line above is where you add the OP and server name.

Giacomo1968
  • 58,727
2

One way I was able to resolve this issue is by stopping and starting the computer browser service from services.msc.

  1. Windows + R
  2. Type Services.msc and hit Enter.
  3. Find computer browser service.
  4. Stop and start the service.
Giacomo1968
  • 58,727
2

In my case my server I was trying to connect to didn’t manage IPv6 well, so I disabled IPv6 on my PC and I was able to connect via the host name without issue.

Trying ping to the server by IP and by hostname.

If it shows a IPv6 address when by hostname try disabling the IPv6 layer in your network card, via its hardware properties.


To disable IPv6 on Windows 11, I followed these steps:

  1. Start Menu --> View Network Connections
  2. Right click on your network adapter and select properties
  3. Find "Internet Protocol Version 6 (IPv6)" and uncheck it.
  4. Click Okay and Reboot the Computer
Reboog711
  • 211
1

I know this is a very old question, but I also know that people are still having problems with this. The top answer did touch on this at the very end of their post, but I don't think enough emphasis was put on how important this really is. The issue is Windows XP runs off of SMB 1.0 and does not support SMB 2.0.

Windows 10 runs off of SMB 2.0 and does not support SMB 1.0 without enabling it in add / remove programs. This is a fundamental mismatch between the two operating systems.

On the Windows 10 system, hold your Windows logo key and press R, type in appwiz.cpl and hit Enter. Click on "Turn Windows features on or off" and scroll down to SMB 1.0. Click the + next to it and enable SMB 1.0/CIFS client then wait till it finishes and reboot.

Keep in mind, this will introduce a security vulnerability on the Windows 10 system, but you will need to do this to access any shares on that Windows XP system. From there you should be able to map up by computer name or IP address.

If computer name doesn't work, it's likely a failure in your router and it will need to be rebooted. Personally, I prefer mapping everything by IP address. If that still does not work, you may need to provide credentials on the Windows 10 machine to connect to the Windows XP machine.

Giacomo1968
  • 58,727
1

I had this problem on a development domain network and the resolution was to make sure that all computers on the same were syncing time to the domain controller. Previously I had had problems with syncing time so had given up on it and set every PC/server clock manually with w32time turned off.

The solution was to sync them up to the DC as follows. The first two steps might not be needed if you have the service running already

C:\Users\Administrator.DEV>w32tm /register  
W32Time successfully registered.

C:\Users\Administrator.DEV>net start w32time
The Windows Time service is starting.
The Windows Time service was started successfully.

C:\Users\Administrator.DEV>w32tm /config /update /manualpeerlist:10.5.0.2 /syncfromflags:MANUAL The command completed successfully.

C:\Users\Administrator.DEV>w32tm /resync
Sending resync command to local computer
The command completed successfully.

Note that 10.5.0.2 was the IP address of the domain controller

I believe that MS now distrusts computers where the time does not look right. This is true in accessing UNC shares as well as connecting with RDP. Prior to the fix I could connect to the IP address with UNC or RDP, but not with the computername or hostname.

I also found that I had to run the final /resync command several times before it would take effect, and some computers needed rebooting before access via unc was possible, but all resolved eventually with this method.

Mureinik
  • 4,152
1

I had the same issue with one particular computer and all other computers on that very same network would connect perfectly, both via PC name and IP.

That troubling computer would connect via IP but not via PC name. And doing a ping using that PC name would return the proper IP and return the ping. It was just all very strange.

Doing some more digging I did discover that I had a wrong (old) IP address dedicated to that PC (host name) in my file lmhosts location:

C:\Windows\System32\drivers\etc\lmhosts

I removed that and also checked for any wrong entries in the hosts file, location:

C:\Windows\System32\drivers\etc\hosts

Did a reboot and still no connection. I tried everything thinkable besides renaming the computer, and I am not one to easily give up. I had no intention to wanting to rename that computer, but gave in with the idea to just "trying it out". And it connected!

It could have been that the router somehow was still holding the cache from the old IP that prevented me to get a connection, but instead of digging deeper into things I just left it at that new name.

Giacomo1968
  • 58,727
MeSo2
  • 197