(I realize this is three years later, but I found it when searching for how to do similar, and later learned how to do it. Maybe I can help other searchers.)
This can be done, but it is not so simple. Copy this to Notepad or similar:
<LayoutModificationTemplate
    xmlns="http://schemas.microsoft.com/Start/2014/LayoutModification"
    xmlns:defaultlayout="http://schemas.microsoft.com/Start/2014/FullDefaultLayout"
    xmlns:start="http://schemas.microsoft.com/Start/2014/StartLayout"
    Version="1">
  <LayoutOptions
    StartTileGroupCellWidth="8"
    StartTileGroupsColumnCount="2"
    FullScreenStart="false" />
  <DefaultLayoutOverride>
    <StartLayoutCollection>
      <defaultlayout:StartLayout GroupCellWidth="8">
        <start:Group Name="Productivity">
          <start:Tile Size="2x2" Column="0" Row="0" AppUserModelID="microsoft.windowscommunicationsapps_8wekyb3d8bbwe!Microsoft.WindowsLive.Calendar" />
          <start:Tile Size="4x2" Column="2" Row="0" AppUserModelID="microsoft.windowscommunicationsapps_8wekyb3d8bbwe!Microsoft.WindowsLive.Mail" />
          <start:DesktopApplicationTile Size="2x2" Column="6" Row="0" DesktopApplicationLinkPath="%APPDATA%\Microsoft\Windows\Start Menu\Programs\Accessories\Notepad.lnk" />
        </start:Group>
        <start:Group Name="Explore">
          <start:Tile Size="2x2" Column="0" Row="0" AppUserModelID="Microsoft.WindowsStore_8wekyb3d8bbwe!App" />
          <start:Tile Size="1x1" Column="6" Row="0" AppUserModelID="Microsoft.MicrosoftEdge_8wekyb3d8bbwe!MicrosoftEdge" />
          <start:Tile Size="4x2" Column="2" Row="0" AppUserModelID="Microsoft.BingWeather_8wekyb3d8bbwe!App" />
          <start:DesktopApplicationTile Size="1x1" Column="7" Row="0" DesktopApplicationLinkPath="%APPDATA%\Microsoft\Windows\Start Menu\Programs\OneDrive.lnk" />
        </start:Group>
      </defaultlayout:StartLayout>
    </StartLayoutCollection>
  </DefaultLayoutOverride>
</LayoutModificationTemplate>
Save that into a file with the .xml extension, like Layout.xml, and put it somewhere easy to type, like C:\Temp.
Next, open PowerShell as Administrator.
Run:
Import-StartLayout -LayoutPath "C:\Temp\Layout.xml" -MountPath "C:\"
assuming you put the file in C:\Temp.
At this point that layout would apply to all users created after this point. You probably want it to apply to your own user profile too. The easiest way is to wipe your start menu.
Unfortunately the way to do that seems to change every year. If you're on Windows 10 version 1809, run:
Remove-Item 'HKCU:\Software\Microsoft\Windows\CurrentVersion\CloudStore\Store\Cache\DefaultAccount\*$start.tilegrid$windows.data.curatedtilecollection.tilecollection' -Force -Recurse
If you're still on 1709 or so, run:
Remove-Item 'HKCU:\Software\Microsoft\Windows\CurrentVersion\CloudStore\Store\Cache\DefaultAccount\$start.tilegrid$windows.data.curatedtilecollection.root' -Force -Recurse
(source: https://www.joseespitia.com/2019/03/13/how-to-reset-your-start-menu-layout-in-windows-10-1809/ )
After all that, either reboot, or kill the Explorer process with
Get-Process Explorer | Stop-Process
And here it is applied:
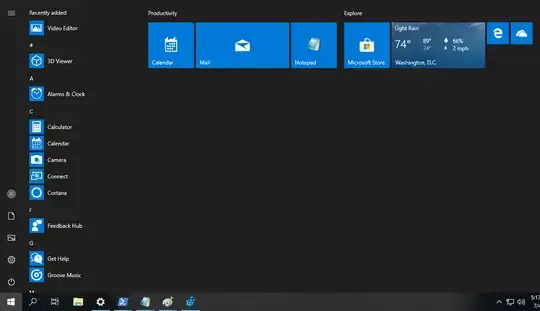
Note in particular the StartTileGroupCellWidth="8" in the XML. Unfortunately I have not figured out how to change this per panel/group; it appears to be all-or-nothing, despite the separate GroupCellWidth="8" entry. Also a size of only 4 does not seem to work.
Still, hopefully now you or anyone stumbling across this later can get the idea of how to use this template to make their own custom Start Menu layout file. I tried to give a variety of sizes and types to help.
Bonus: To get the name of an app to put in AppUserModelID, run in PowerShell Get-StartApps
(I find Tile better than DesktopApplicationTile because it doesn't matter where the shortcut .lnk file is. It also allows for 'placeholders' before the app is even installed.)

