Actually, there is one way.
The basic idea is to start a RDP session for each user that you want to be automatically logged on; these (localhost) RDP sessions will be started by some scheduled tasks, one for each user to be auto logged on.
Each task will be killed after 1 minute, and each following task will be delayed 2 minutes more than the previous ones, so that we will have only one active RDP connection to the server (depending on the license, one can only perform 2 simultaneous connections to the Windows Server machine)
EDIT 2 March 2025:
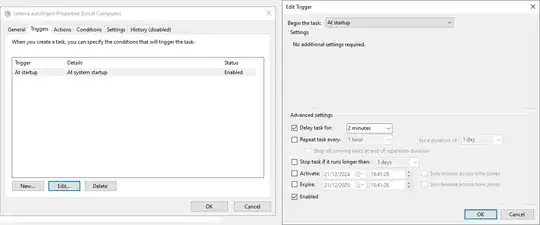
After a couple of months of experimenting with 3 autologon users with a Contabo VPS, I found sometimes some of the users would not have been automatically logged in. I suspect that sometimes the limitation of a maximum of 2 RDP session active simultaneously has kicked in. I extended the delay to 5 minutes, including the first autologon user, and all is working well now.
Full instructions:
- Log in to the computer with an additional user (NOT one of the users to be automatically logged on), which will be used as the autologon master. I chose the Administrator user for that.
- Create a RDP connection file for each user that you want to autologon. That file needs to have login information embedded in it (the plaintext username, and an encrypted form of the password will be stored into the RDP file). I created a Powershell script that creates such files, following the instructions in this answer: you can find the script on the Bonus Files section below
- Test the RDP connection file by double-clicking on it: it should be opening the RDP connection without asking anything. In particular, the first time you perform such a connection, a security confirmation message may ask you if you want to continue connecting to the untrusted computer. Should that message appear, mark the checkbox on
Don't ask me again for connections to the computer and press the Yes button
- Start the Task Scheduler and import the task from the Bonus Files section below, then customize it by following the instructions. Alternatively, you can create a new basic task and:
- Set the task name, description, and user who will run the task; set the task to be run whether the user is logged on or not:

- Set the trigger
At startup:
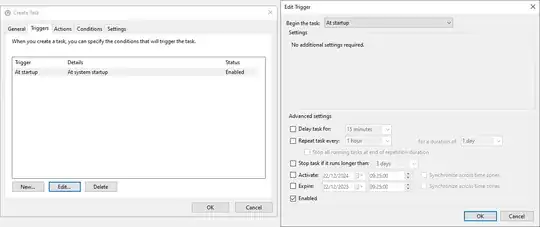
- If this is not the first user who will be automatically logged on, set the delay. 2 minutes for the second user, 4 minutes for the 3rd user, 6 minutes for the 4th user, and so on
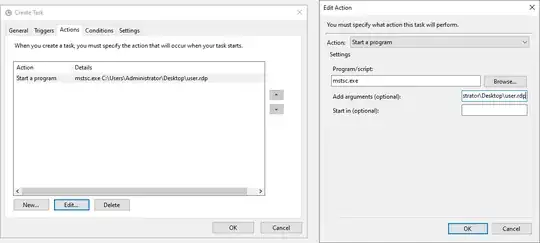
- Set the action to run
mstsc.exe, and setting the argument as the embedded authentication RDP file path:
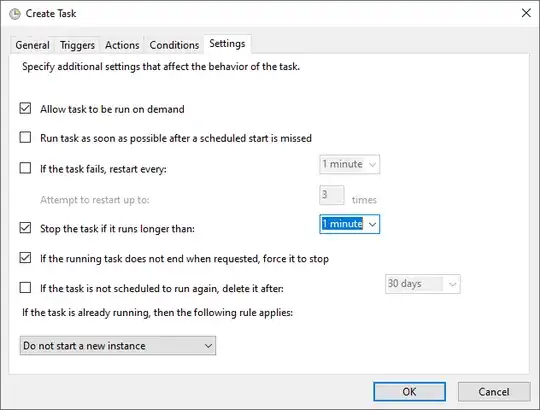
- Adjust the conditions as below (in particular, uncheck all the ticks from the
Power section:

- Set the task to be killed after 1 minute (otherwise, the RDP client connection will stay alive forever)
- Press OK to save the task. The system will ask for the password of the user who will run the task

- Repeat steps 2 to 4 for each additional user that needs to be automatically logged on
Done!
This works for me on Windows Server 2022 Datacenter 21H2. Tested on December 2024.
Security implications
The RDP files will need to contain an encrypted form of the password of the user to be automatically logged on. That encryption is reversible, and the password may be retrieved. This may be unacceptable in some environments.
The user who will run the tasks will need to access the RDP files, and so he can retrieve the passwords of the automatically logged on users. This includes any malicious software that such user may be running
The RDP files are saved on disk, and so whoever can access the disk, can retrieve the passwords of the automatically logged on users.
The task needs to have the option Do not store password. The task will only have access to local computer resources off, because we need to use a network connection to connect through RDP, even if it connects locally. This will ask the password for the user who will run the task, and that password will be stored by Windows with reversible encryption on the disk (I suppose using some LSAsecret)
This made me choose the Administrator user as the user who will run the autologon tasks, because:
- This is a rented server, so I already need to put trust in the renting company to not steal or spy my files
- Users do already trust the Administrator, so they share their passwords with him
- Should the Administrator user be compromised, the entire machine is compromised so we already lost
Bonus files
PowerShell script for creating RDP files with embedded authentication.
Instructions:
- Create a new text file and paste the following text into it. This NEEDS to be saved on the same machine where the RDP file will be used, as the password will be encrypted using a key that is unique per machine.
- Change extension to .ps1
- Right click on the script, and choose "Run with PowerShell" as an administrative user
- A console window will open, asking you to change the execution policy. Press Y and Enter
- Provide the needed information in the inputboxes opened by the script
- Choose a destination folder and confirm
- Done! You will have your user.rdp file with default options. Double-click on it to open a localhost RDP connection right now and test the file
- You can optionally choose an already created .rdp file: the script will only change the user and encrypted password information in it, keeping all the other data untouched.
- Remember: the created RDP file will contain a valid encrypted password only for the same machine where it has been created. It cannot be transferred to other machines, or the RDP client will ask for the password
Here's the script contents:
################################################################################
# ASSEMBLY IMPORT
################################################################################
# For Microsoft.VisualBasic.Interaction.InputBox
Add-Type -AssemblyName Microsoft.VisualBasic
# For System.Windows.Forms.SaveFileDialog
Add-Type -AssemblyName System.Windows.Forms
################################################################################
CONSTANTS
################################################################################
Application name for window titlebars
$APPTITLE = 'RDP file creator'
Default content of RDP file
$DEFAULT_RDP_FILE_CONTENT = @'
screen mode id:i:2
use multimon:i:0
desktopwidth:i:1920
desktopheight:i:1080
session bpp:i:32
winposstr:s:0,3,0,0,800,600
compression:i:1
keyboardhook:i:2
audiocapturemode:i:0
videoplaybackmode:i:1
connection type:i:7
networkautodetect:i:0
bandwidthautodetect:i:1
displayconnectionbar:i:1
enableworkspacereconnect:i:0
disable wallpaper:i:1
allow font smoothing:i:0
allow desktop composition:i:0
disable full window drag:i:1
disable menu anims:i:1
disable themes:i:1
disable cursor setting:i:0
bitmapcachepersistenable:i:1
full address:s:localhost
audiomode:i:0
redirectprinters:i:0
redirectcomports:i:0
redirectsmartcards:i:0
redirectwebauthn:i:1
redirectclipboard:i:0
redirectposdevices:i:0
autoreconnection enabled:i:0
authentication level:i:2
prompt for credentials:i:0
negotiate security layer:i:1
remoteapplicationmode:i:0
alternate shell:s:
shell working directory:s:
gatewayhostname:s:
gatewayusagemethod:i:4
gatewaycredentialssource:i:4
gatewayprofileusagemethod:i:0
promptcredentialonce:i:0
gatewaybrokeringtype:i:0
use redirection server name:i:0
rdgiskdcproxy:i:0
kdcproxyname:s:
enablerdsaadauth:i:0
drivestoredirect:s:
'@
################################################################################
MAIN
################################################################################
Ask for username and password to be saved in the RDP file
$msg = 'Enter the username:'
$username = [Microsoft.VisualBasic.Interaction]::InputBox($msg, $APPTITLE)
$msg = 'Enter the password:'
$raw_pw = [Microsoft.VisualBasic.Interaction]::InputBox($msg, $APPTITLE)
Encrypt the password
$enc_pw = ($raw_pw | ConvertTo-SecureString -AsPlainText -Force) | ConvertFrom-SecureString;
Ask for the output file
If the file already exists, it is modified with the needed content
$saveFileDialog = [System.Windows.Forms.SaveFileDialog]@{
    OverwritePrompt  = $true
    InitialDirectory = [Environment]::GetFolderPath('MyDocuments')
    FileName         = $username
    Title            = 'Select the output file. Existing file can be selected, to update it'
    Filter           = "Remote Desktop Connection files (.rdp)|*.rdp"
}
Show save file dialog box
if($saveFileDialog.ShowDialog() -ne 'Ok') {
    Exit
}
If the file is existing, get the current file content
$clean_rdp_file_content = $DEFAULT_RDP_FILE_CONTENT
if(Test-Path $saveFileDialog.FileName) {
    $clean_rdp_file_content = Get-Content $saveFileDialog.FileName | Where { $_ -notmatch "^(username:s:|password 51:b:)" }
}
Create the RDP file
Out-File -FilePath $saveFileDialog.FileName -InputObject $clean_rdp_file_content -Encoding utf8
Out-File -FilePath $saveFileDialog.FileName -InputObject "username:s:$($username)" -Encoding utf8 -Append
Out-File -FilePath $saveFileDialog.FileName -InputObject "password 51:b:$($enc_pw)" -Encoding utf8 -Append
Nearly-ready made Task Scheduler task file, to be imported into Task Scheduler
Instructions:
- Create a new text file and paste the following text into it
- Rename the file to autologon-user.xml
- Start the Task Scheduler
- Press the
Action \ Import Task... menu
- Select the autologon-user.xml file. A Task Properties window will open.
- On the General tab, customize the task name and description, and set the user who will run the task
- On the Actions tab, edit the action by setting the path to the user.rdp file
- If this is not the first user who will be logged in, go to the Triggers tab and edit the trigger by setting the
Delay Task for: field. Enter 2 minutes for the second user, 4 minutes for the 3rd user, 6 minutes for the 4th user, and so on.
Here's the file contents:
<?xml version="1.0" encoding="UTF-16"?>
<Task version="1.2" xmlns="http://schemas.microsoft.com/windows/2004/02/mit/task">
  <RegistrationInfo>
    <Date>2024-12-22T10:00:00.0000000</Date>
    <Author>Administrator</Author>
    <Description>Automatically logs in user</Description>
    <URI>\user autologon task</URI>
  </RegistrationInfo>
  <Triggers>
    <BootTrigger>
      <Enabled>true</Enabled>
    </BootTrigger>
  </Triggers>
  <Principals>
    <Principal id="Author">
      <UserId>S-1-5-21-123456789-9876543210-1122334455-500</UserId>
      <LogonType>Password</LogonType>
      <RunLevel>LeastPrivilege</RunLevel>
    </Principal>
  </Principals>
  <Settings>
    <MultipleInstancesPolicy>IgnoreNew</MultipleInstancesPolicy>
    <DisallowStartIfOnBatteries>false</DisallowStartIfOnBatteries>
    <StopIfGoingOnBatteries>false</StopIfGoingOnBatteries>
    <AllowHardTerminate>true</AllowHardTerminate>
    <StartWhenAvailable>false</StartWhenAvailable>
    <RunOnlyIfNetworkAvailable>false</RunOnlyIfNetworkAvailable>
    <IdleSettings>
      <StopOnIdleEnd>true</StopOnIdleEnd>
      <RestartOnIdle>false</RestartOnIdle>
    </IdleSettings>
    <AllowStartOnDemand>true</AllowStartOnDemand>
    <Enabled>true</Enabled>
    <Hidden>false</Hidden>
    <RunOnlyIfIdle>false</RunOnlyIfIdle>
    <WakeToRun>false</WakeToRun>
    <ExecutionTimeLimit>PT1M</ExecutionTimeLimit>
    <Priority>7</Priority>
  </Settings>
  <Actions Context="Author">
    <Exec>
      <Command>mstsc.exe</Command>
      <Arguments>C:\Users\Administrator\Desktop\user.rdp</Arguments>
    </Exec>
  </Actions>
</Task>


