2

I'm writing a long series of dialogs, and I'd like paragraph styles to include the character's name as a bullet, as in styles Mary and Peter below:

Mary: That's an absurd idea!

Peter: Well, at least it's an idea.

By defining Mary as the style to follow Peter, and vice versa, I'd save a lot of typing and distraction from the dialog itself. But I can't figure out how to do it in MS Word Mac v. 16.45 (21011103) Many thanks to any who can help!

2 Answers2

3

Here’s detailed instructions for how to do this with Word for the Mac that are specific to your question:

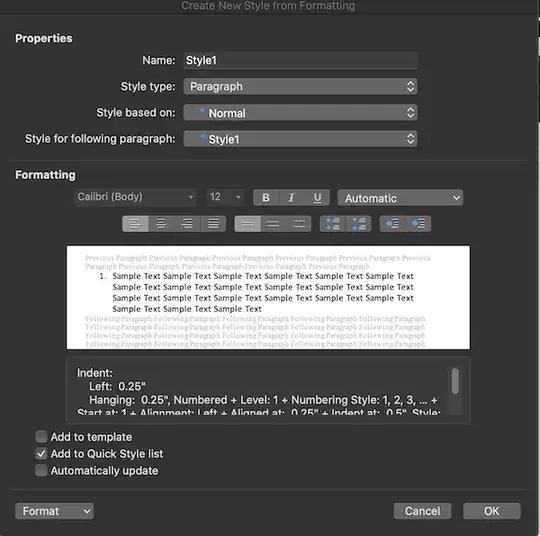
  1. From the Home tab open the Styles Pane and select New Style… you can also get to the New Style dialog from the Menu Bar by choosing Format > Styles.
  2. Setup one Paragraph style foreach play character. I suggest a prefix on the name so all will be clustered together in the style list. For example, A_Mary, A_Tom, etc.

enter image description here

  1. You can create up to nine styles.
  2. Except for the last Actor in your list, I recommend setting the Following paragraph style to the same style name. Only the last style should link back to the first style. Using this approach in your document, when you select the style to use, let’s say it’s A_Mary, after typing in her script you press Return and another paragraph for Mary is setup. All you then must do is press Tab and the paragraph switches to A_Tom. If Tom is not who you want just press Tab and you get the next actor in your list. When you reach the end of the list it starts over.
  3. In the first Custom Style you create, for the “Based on Style” setting, use whatever is your body text or Normal style for documents (font settings). For subsequent Custom Styles you create, use the previous Custom Style name.
  4. If you plan to use these styles in more than one document, then mark the add to template checkbox, which will place these in your Normal template. If you are going to use these in a Custom Template, you do this process with that Custom Template attached … or use the Organizer function to move these styles from Normal to your Custom Template.
  5. I don’t recommend adding these to Quick Styles, unless you are using my AuthorTec Quick Styles add-in, which organizes an otherwise over cluttered and useless list of styles.
  6. Never turn on the Automatically Update… that’s another whole topic.
  7. Don’t worry about formatting, other than “Based on Style”, at this time. You can do that latter.
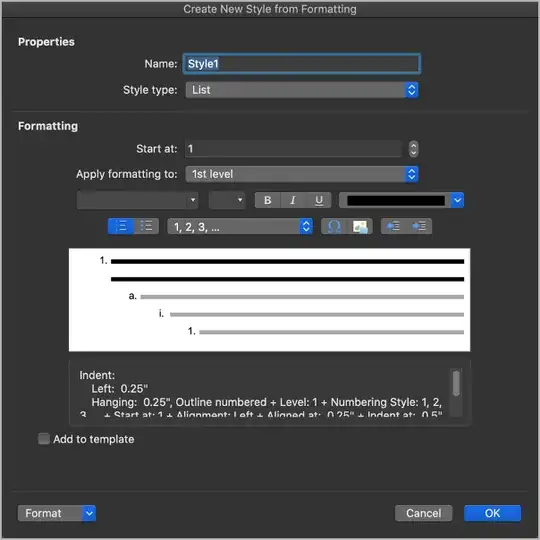
  8. The final New style you create it will be a Custom List Style, which is the controller for the list paragraphs you just created. When you change the Style type setting to List, the dialog modifies to look like this:

enter image description here

  1. Give this Custom List controller a unique name, something that you know will be related to those Custom Paragraph Styles you just created.
  2. Don’t worry about any Formatting settings shown in the middle of this dialog.
  3. If you are applying your Custom Paragraph Styles to a Template, make sure you check the Add to template box.
  4. The final thing to do is pull down that Format menu in the bottom left of the dialog and choose the Numbering option, and then click OK.
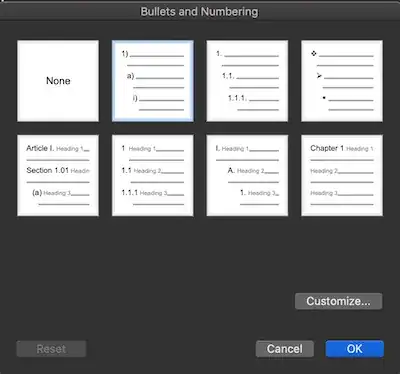
  5. Displaying next is the Bullets and Numbering dialog. Choose the Customize button.

enter image description here

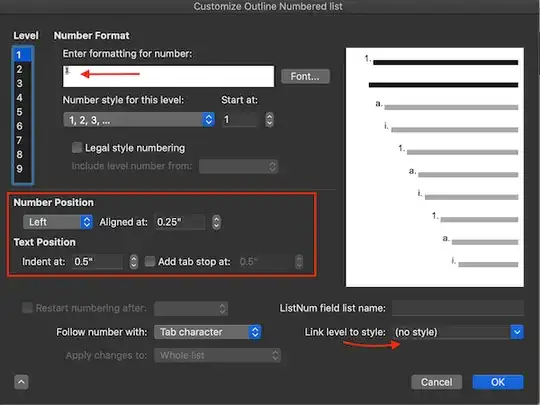
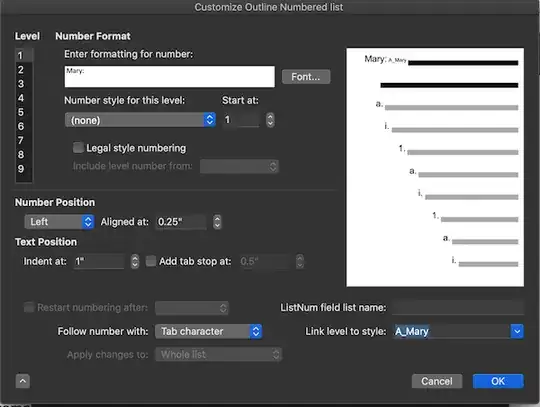
  1. The following dialog displays and use the down pointing icon in the lower left corner to show the full dialog.

enter image description here

You see on the upper left of the dialog the level numbers for the list. Click these numbers to assign your Custom Paragraph Styles to a level. One paragraph per level. For each level you complete the areas I have marked in red.

  1. For Level 1, replace in the “Enter formatting for number:” box the first Actor/Performer name that will appear in your document when this style is used.

enter image description here

The “Number Position” for Mary will align Left and 0.25 … this is the default. You can move it to the Left edge of the page by changing the Aligned at value to 0. For the Text Position indent, you will have to experiment with it because your Performers names might longer than others and if you want their script aligned, you will have to allow for the longest name. Remember to link your Custom Paragraph Style for Mary to this level.

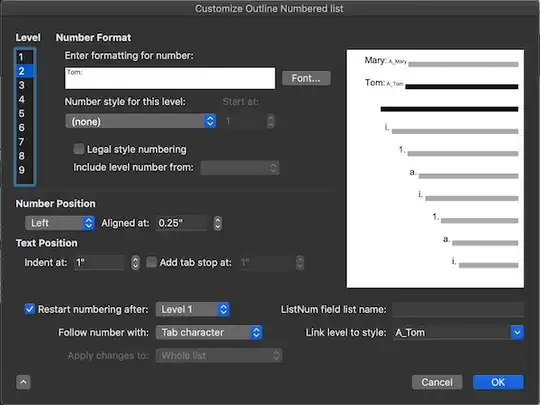
  1. When you click on number 2, you add your next level and follow the same process as before. Set the alignment position to the same you used for Level 1, and your determined Indent amount for the text script. Finally, link this level to the paragraph style you setup for this actor/performer.

enter image description here

  1. Keep doing this until all your actors have been assigned a level. Then back your way out by clicking OK on all the open dialogs.

Your list is now ready to use.

1

You need to use the Define New MultiLevel List Dialog to do this.

Directions for doing this can be found on Shauna Kelly's page on Numbering or on bullets. The Mac version of the instructions are on John Korchok's page.

Words cannot be part of a style but they can be part of a numbering or bullet definition linked to a style through the Define New MultiLevel List Dialog.

First create the paragraph styles you will be using for Mary and Peter. Both can be based on Normal and otherwise indistinguishable from Normal. Have the style for following paragraph in each be the other.

Then create the MultiLevel List that attaches two different levels to them and add the text in the list level definition.

The key to this method is to use the styles. You can assign keyboard shortcuts to each to trigger them. If you need to switch back to the Normal style, you can use the keyboard shortcut built into Word for that if you want. (Ctrl+Shift+N in the Windows versions and Cmd+Shift+N in the Mac versions) Assigning Keyboard Shortcuts in Word