6

I bought a new NVME SSD to use as my primary/boot drive. My old SSD is going to still be in my PC and be used as extra storage.

I installed the NVME SSD into my PC. It doesn't show up in my file explorer, but it does show up on disk manager.

It says that the drive is not initialized and it asks me if I want to initialize it with MBR or GPT. I'm not sure what to do for this.

I want to use AOMEI Backupper to move everything from my old SSD to my new one, but I don't know if I need to initialize the new SSD first and whether to use MBR or GPT.

Keep in mind that my new SSD does not yet have Windows on it, as I am planning to transfer Windows from my old SSD to my new one using AOMEI Backupper

Ramhound
  • 44,080
Sophie
  • 63

3 Answers3

6

I installed the NVME SSD into my PC. It doesn't show up in my file explorer, but it does show up on disk manager.

It says that the drive is not initialized and it asks me if I want to initialize it with MBR or GPT. I'm not sure what to do for this.

I want to use AOMEI Backupper to move everything from my old SSD to my new one, but I don't know if I need to initialize the new SSD first and whether to use MBR or GPT.

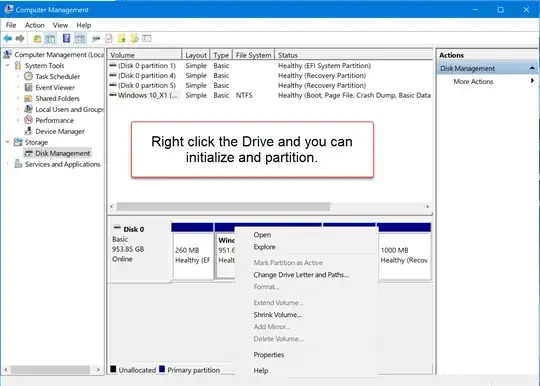
You need to initialize the SSD in Disk Management in order to see it in File Explorer and to install new system.

However, You may not need to initialize the disk just to use AOMEI Backupper.

I put a screen shot below showing how to initialize your disk if you wish to do so. There is no harm done initializing a disk.

New disks are normally GPT and you should format it that way. This disk is for your primary boot disk and so should be formatted as GPT. This drive is for Windows 10 and using GPT is the best way to go.

Also, you said "I want to use AOMEI Backupper to move everything from my old SSD to my new one": While it is not always necessary, I always suggest doing a fresh install to prevent errors (from the existing system used for some months / years) from creeping in. This has always worked better for me and will pay handsome dividends in the future. This is the same computer so Windows will activate properly.

. .

Use Disk Management to Initialize:

enter image description here

3

I want to use AOMEI Backupper to move everything from my old SSD to my new one, but I don't know if I need to initialize the new SSD first and whether to use MBR or GPT.

  • All drives must be initialized with a partition table prior to use and if you have a UEFI motherboard, GPT is recommended
  • Windows natively supports capturing/applying partition images
    (using 3rd party solutions often results in issues, which I cover near the end of this answer)


(Regardless of section, O: refers to the applicable old partition, N: to the applicable new partition)

  1. Configure the required partitions on the new drive: WinKey+ROpen: DiskPartOK
    1. Select the new drive and create the partition table:
      Lis Dis
      Sel Dis #
      Clean
      
      UEFI:
      Convert Gpt
      

    2. Create boot partition:
      • BIOS:
        Cre Par Pri offset=1024 Size=100
        Format Quick Fs=NTFS Label=Boot
        Active
        
      • UEFI:
        Cre Par EFI Size=100
        Format Quick Fs=FAT32 Label=EFI
        Assign Letter=Y
        Cre Par Msr Size=16
        

    3. Create OS partition, with:
      • Rest of the drive as the OS partition:
        • BIOS:
          Cre Par Pri
          Format Quick Fs=NTFS Label=System
          Shrink desired=1024 min=1024
          
        • UEFI:
          Cre Par Pri Id=ebd0a0a2-b9e5-4433-87c0-68b6b72699c7
          Format Quick Fs=NTFS Label=System
          Shrink desired=1024 min=1024
          
      - or -
      • Additional partitions after the [300GB] OS partition: (multiply size by 1024: 300*1024=307200)
        Max size required is ~300GB if not storing User Data directories on C: (recommended)
        • BIOS:
          Cre Par Pri Size=307200
          Format Quick Fs=NTFS Label=System
          Shrink desired=1024 min=1024
          
        • UEFI:
          Cre Par Pri Size=307200 Id=ebd0a0a2-b9e5-4433-87c0-68b6b72699c7
          Format Quick Fs=NTFS Label=System
          Shrink desired=1024 min=1024
          

    4. Create WinRE partition:
      Must have 320MB free; WinRE.wim is ~420MB in size (allow for future size increases)
      • BIOS:
        Cre Par Pri Size=768 Id=27
        Format Quick Fs=NTFS Label=WinRE
        Exit
        
      • UEFI:
        Cre Par Pri Size=768 Id=de94bba4-06d1-4d40-a16a-bfd50179d6ac
        Format Quick Fs=NTFS Label=WinRE
        Gpt Attributes=0x8000000000000001
        Exit
        

  2. Boot to WinRE: SettingsUpdate & SecurityRecoveryAdvanced startup: Restart now
    AdvancedTroubleshootingCommand Prompt
    1. Determine drive letters of the old and new OS partitions:
      DiskPart
        Lis Vol
        Exit
      
    2. Capture WIM of the old OS partition:
      (Save to a partition containing free space of ~40% the size of the data on the OS partition)
      Dism /Capture-Image /ImageFile:"Z:\Base.wim" /CaptureDir:"O:" /Name:"Windows Backup" /Description:"Base Image 2022.01.09 @ 18:40" /Compress:Max /CheckIntegrity /Verify /ScratchDir:"Z:"
      
    3. Apply WIM to the new OS partition:
      Dism /Apply-Image /ImageFile:"Z:\Base.wim" /Index:1 /ApplyDir:"N:" /CheckIntegrity /Verify /ScratchDir:"Z:"
      
    4. Create boot files on the new drive:
      (Don't add the old OS when asked in the last BootRec command)
      • BIOS:
        BootRec /FixMBR && BootRec /FixBoot && BootRec /RebuildBCD
        
      • UEFI:
        ::# Mount EFI partition:
            DiskPart → Lis Vol → Sel Vol # → Assign Letter=Y → Exit
        

        ::# Create EFI directories and enter: MkDir "Y:\EFI\Microsoft\Boot" Cd /d "Y:\EFI\Microsoft\Boot"

        ::# Create EFI boot structure: BootRec /Fixboot

        ::# If Access Denied error occurs:
            BcdBoot N:\Windows /s N: /f UEFI


        ::# Resolve any other boot issues: BootRec /FixMBR && BootRec /RebuildBCD

        ::# Unmount EFI partition: DiskPart → Sel Vol Y → Remove → Exit


  3. Copy WinRE.wim from old drive's WinRE partition to the new one:
    # Refer to drive letters from #2.1: (if unsure: Sel Vol # → Det Par)
      RoboCopy /E /Sec "O:\Recovery" "N:\Recovery"
    

  4. Reboot: wpeutil rebootConfigure WinRE once booted back to Windows:
    1. Open an Admin Terminal: WinKey+ROpen: powershellCTRL+SHIFT+OK
    2. Mount new drive's WinRE partition:
      DiskPart
        Lis Vol
        Sel Vol #
        Assign Letter=Z
        Exit
      
    3. Configure WinRE:
      # Disable WinRE:
        ReAgentC /Disable
      

      Set Custom WinRE Path:

      ReAgentC /SetREimage /Path "Z:\Recovery\WindowsRE"

      Enable WinRE and verify:

      ReAgentC /Enable ; ReAgentC /Info

    4. Remove WinRE mount point: DiskPartsel vol zremoveexit
JW0914
  • 9,096
2

“Initialize” means to format and/or partition the storage media.

I assume you are using Windows from another internal installation and want to move or clone it to the newly installed SSD. Some SSD manufacturers have special editions of “migration software”, which will do the moving job for you, hence you don't need to initialize the new SSD. For example, Western Digital (SanDisk) provides a free special edition of Acronis True Image in their downloads section, which will only work with WD/SanDisk drives. Other SSD manufacturers have similar software.

The software is often guided and will clone your current installation, including shrinking it if necessary, to the new SSD. There is no initialization of the SSD needed beforehand.

You really need to do drive cloning, since copying only the Windows partition will have you loose the boot information on the new SSD. As a result, Windows will not be able to boot from the NVMe SSD. With AOMEI Backupper the free edition should have the clone function...

So your STEP 1 is the cloning operation. Be sure to get this one right, and when it's done, you should have a C:\Windows and something like a D:\Windows (could also be another letter, but you should be able to identify it as the newly cloned drive).

To make the later steps easier, mark the original and the clone after the cloning is complete, by simply creating a new text file from Windows Explorer: one file on C:\, which you could name OLD-Windows.txt, and on the cloned Windows partition e.g. D:\NEW-Windows.txt. (No text needed, just the filename to identify the partition later. So the files will have a file size of 0.)

On to STEP 2...

Once the cloning is done, I recommend to run bcdedit from the elevated Windows Command Prompt. But first you need to mount the ESP, short for “EFI System Partition”, on the cloned drive. This is important, since you will want to select the NVMe-SSD as your primary boot device once you've moved (cloned) Windows.

To do that, first execute an elevated command prompt. Use Win+X and select “Command Prompt (Admin)” (Windows 8/10) or “Windows Terminal (Admin)” (Windows 11), although there is more than one way to do this.

Then type diskpart ↩ Enter and find the ESP like so (likewise always followed by ):

  • list disk
  • select disk n
  • list partition
  • select partition n
  • assign letter=z
  • exit

Replace the n by the disk representing the SSD (e.g. select disk 1) and again (a different n that is) by the partition of the ESP. You can also try the command list volume (and select volume n), but I don't think it should be necessary.

Be careful, since you now have two similar drives, the original one and the cloned one! Be logical about it: If C: is on the old (currently booted) partition, then the newly cloned SSD will have the Windows partition with another drive letter, maybe D:. So if you see C: on the disk you selected, select the other one. Be also logical about the ESP: It contains the EFI boot loaders and boot configuration for Windows, and by default Microsoft makes it a 200 MB FAT32 partition. It's label is probably “System” or “ESP” or similar. It will be present on both drives after the cloning process! (If it is on the same drive as C: is, choose the other one!)

Once you've identified and selected the ESP on the cloned drive, assign a drive letter to it, in the above example Z: (but you may freely choose any available drive letter of your liking), and exit Diskpart.

Now we simply use BCDEdit to add a new boot configuration, as follows (explaining each option separately):

  • bcdboot
  • D:\Windows – replace D: with the drive letter of the cloned Windows partition
  • /l en-us – language selection (optional); change to your liking (e.g. ja-jp)
  • /s Z: – replace Z: by the drive letter of the EFI System Partition (ESP)
  • /v – verbose mode (for better failure analysis, in case of an error)
  • /p – select the cloned Windows partition as the default EFI boot option
  • /c – don't preserve the previous boot configuration (which was cloned and most likely wrong anyway)

The full command looks like this: bcdboot D:\Windows /l en-us /s Z: /v /p /c

With this command the ESP on the cloned drive should be updated for the newly cloned Windows partition and the UEFI boot selection from the computer should also default to the newly installed drive. Thus, when you now reboot your system, which you should do, it will be booted from the cloned drive. But since it's a clone, it will look exactly the same, only C: is now on the NVMe-SSD. You will see a D:\Windows as before, but this is (after the reboot) hopefully the previous drive, from which you started. To make sure it all went according to plan, see if C:\NEW-Windows.txt is there, because then you confirmed that it's the new drive that has been booted.

To double-check that not only the Windows partition was transferred correctly, but also the boot loaders, temporarily disconnect the old drive (always while the computer is powered down!) and reboot. If everything works correctly without the old drive, you can reconnect it (again, while powered down). Once this is done, you can “re-initialize”, means format ;-), the old drive and reuse it for something else. I recommend starting Disk Management (Win+X and select “Disk Management”) to re-format the old drive (delete all existing partitions), and make one big NTFS partition on it... And don't forget to delete the NEW-Windows.txt file from your cloned (now only) Windows installation, since you don't need it anymore.

Have fun!
luttztfz
  • 351