There perhaps is too much discussion here around interpreting your SMART values, rather than discussing what is necessary to determine the condition of your disk.
In 30 years of diagnosing bad hard disks rarely ever did I use SMART values to do it. Indeed, it didn't even exist back then. That's not to say there isn't value with the SMART stats, but you can see the kind of confusion it causes. The problem with SMART is that each manufacturer implements it in different ways, and it's nearly impossible to know for sure what you're looking at unless the manufacturer's own specification is documented, or their own tool interprets them.
My suggestion is that you perform a surface scan on the disk. A surface scan, sometimes referred to a "long test" in some tools, will physically read (and optionally write) every physical sector on the disk helping to determine the condition of the drive. This type of test is primarily used on hard disks, and has little value on SSDs, although I was able to detect a bad SSD one time with a surface scan, that was otherwise passing other diagnostic tools.
First, a warning. If your drive has bad sectors, this test will find them. If your drive is failing, it may have hundreds of bad sectors. Running this test on a failing drive will make it worse. Data recovery and backup is priority one! Rescue your data FIRST with a backup or clone of the disk BEFORE running surface scans on it.
Now, there are many tools which can perform these tests. Most manufacturers release their own tools which can do this type of test, and there are other commercial and freeware products available. Back when I did this on a regular basis, I most recently used a tool call HDD Regenerator. Before that we used a tool called SpinRite. In addition there are Seagate Seatools, Western Digital Data LifeGuard Tools, and many others. However, I fall back on a freeware tool called HDDScan for easy Windows based tests, especially for end users.
So, how do you use HDDScan to determine if your drive is good or bad?
Get the tool and start the test:
- Navigate to https://hddscan.com and download the .zip file of the tool.
- The tool does not require installation on your computer. Instead, you can decompress the downloaded .zip file by using your favorite tool, or by right-clicking the downloaded .zip file and choosing 'Extract All,' and then follow the instructions.
- You should now have the decompressed HDDScan files in a folder on your computer.
- Double-click the HDDScan.exe file to run the application. HDDScan needs administrative access on your computer and you will be prompted to allow the application to make changes to your computer.
- Accept the license agreement.
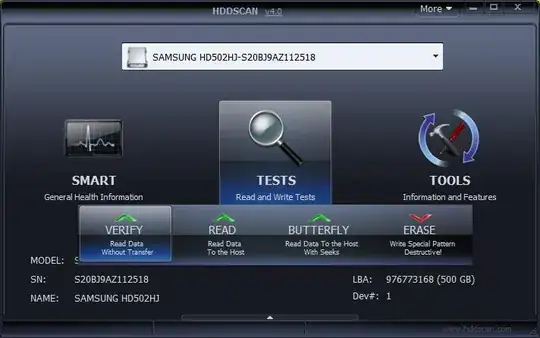
- The first page you are presented with is the drive and test selection page. Choose your drive from the dropdown, and choose the 'TESTS' button. Then choose the 'VERIFY' test.
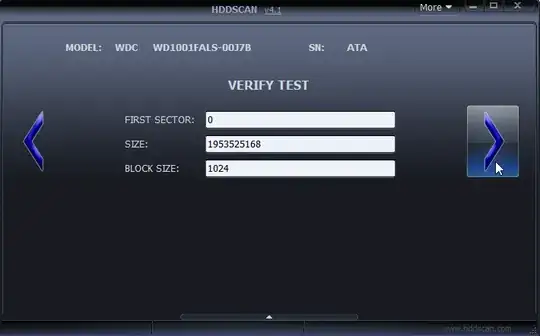
- The next page will allow you to choose the sector range you want to test. In this case, it defaults to the whole disk and you can click the right-arrow to continue. Before starting the test, be sure to close all other applications down on your computer to obtain more accurate results and avoid transient read/writes that can throw the sector read times off.
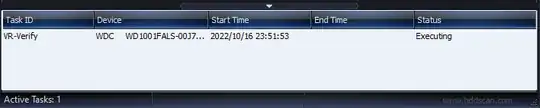
- The test will start immediately and you will see the task in the task list view.
- Double-click the running task to open the live view. You can pause and stop the test here as well.
How do you interpret these results?
First, allow the test to complete. It will take a significant amount of time. However, you should monitor it occasionally. As mentioned earlier, this test will find bad sectors if they exist. And if it starts finding a lot of them (>10), you can stop the test. The drive is failing. There is no sense in continuing to beat it up.
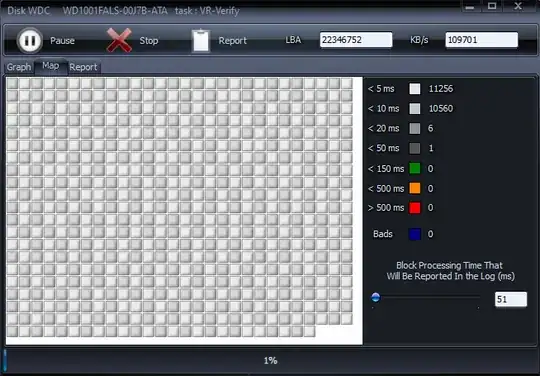
When the test is complete you can review the stats. The test status window has three tabs: Graph, Map, and Report.
The Graph Tab.
This tab displays the testing speed in KB/s during the course of the test. We expect the drive should maintain a fairly consistent read speed throughout the test. Transient spikes may not be an indication of a problem, and could be artifacts of other disk access that occurred by Windows during the scan. It is also worth noting that because the outer edge of a physical disk spins faster than the inner edge, you may see a ramp up or ramp down effect in speed over the course of the test.
Extended bursts of decreased read speed is a clear indication the drive may be having trouble reading the disk surfaces.
The Map Tab.
This view is perhaps the most useful. Here you see a live view of the status of each sector that is read including the time it took to read the sector, and if any bad sectors are detected. In this view, we are primarily interested in the statistics on the right hand side.
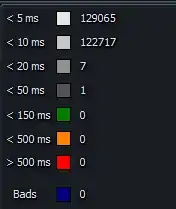
This chart gives you the number of sectors read at certain speeds during the test. By far, most of your reads should be less than 10ms on a properly working drive. By default, any sector which takes longer than 50ms to read will create a log entry on the 'Report' tab. Sectors which take longer than 50ms to read are not necessarily bad. Again, because this is on a running windows system, your drive may be actively used during the test which will affect read speeds. However, if you begin to see a large number of sectors, especially when they are consecutive, taking over 150ms or worse, over 500ms, then this is a pretty clear indicator the drive is having issues reading this area of the drive.
Finally, the number of 'Bads' is the number of bad sectors detected. These are sectors in which the drive was unable to read the sector, and the data in that sector is most likely lost. While slow read times can indicate issues, the bad sector count is a clear indicator the drive has physical damage to it's disk surfaces.
The Report Tab.
This tab displays a log of all events of interest. Whether that be bad sectors or sectors which took an unusually long time to read, this log will show you a summary of things you might need to be concerned about on the drive.
What indicates a bad drive?
There is a little room for personal experience and preference here. However, a general rule of thumb is that slow reading sectors (>150ms) and bad sectors are an indication of physical issues on the drive. But, it is difficult to set hard and fast rules here. Drives do have a pool of spare sectors specifically for handling bad sectors. Drives will automatically lock out bad sectors and remap them to good sectors. To a point, these minor failures are expected and handled by the drive without any user intervention. I have reason to think (but am not sure) that if ANY bad sectors show up in this test, the drive has already exhausted its spare pool of sectors. So, determining when to replace a drive is sometimes decided by your level of risk tolerance.
Here is how I interpret test results.
- If the drive has one or two bad sectors detected on the disk. I get concerned the drive is starting to fail. But, I also understand that the drive may have experienced a single event (such as a drop or bang) that damaged that specific area and it very well may continue to operate just fine. This is especially true if it is 2 or 3 consecutive bad sectors. However, there are numerous times this type of test found 1 or 2 bad sectors and even after returning the drive to service, it failed shortly after. So, this is a scenario where you need to decide what your risk tolerance is, backup often, and possibly continue to monitor the drive rather than replace it.
- If the drive has numerous bad sectors, let's say 10 or more, especially if they are spread around on the drive. The drive is failing. It's time to replace it.
- If the drive has numerous (greater than 10) slow reading sectors (>150ms), especially when consecutive, this can be an indication of problems on the drive. If no bad sectors are found, I would lean towards continuing to monitor in the future. However, when coupled with bad sectors, these slow reading areas are nearly as clear an indicator of physical damage as the bad sectors are and should be counted the same.
Ultimately, if it was MY drive, and any bad sectors are detected I would replace the drive immediately. Drives that are in tip top shape never have slow reading or bad sectors show up in these tests. In fact, many manufacturer diagnostic tools will fail the drive if ANY bad sectors are detected.
Finally, if you are really interested in SMART values. It would be a neat experiment to record the values before this test, and then look at them again after the test. This test will force the drive to read every available sector, so if there are any problems, SMART should be detecting it.


