59

I like to disable Windows Defender Real Time Protection via GPO on Windows 10 Pro. When I configure GPO, Real-Time Protection is shown as off. However after a reboot the Protection is magically enabled again.

GPO settings have not changed. I am trying to disable Real Time Protection to be able to analyze and reverse engineer malware.

In addition even if Windows tells me Real Time Protection is managed by the administrator it is still enabled in the back.

I really wonder if there is a way to completely disable Windows Defender + Real Time Protection or if Microsoft made this impossible.

8 Answers8

94

In newer versions of Windows, Group Policy settings for Microsoft Defender are reverted back.
To prevent this, before changing them:

  1. Open Resource Monitor (type resmon.exe in the search box)
  2. Overview
  3. Find MsMpEng.exe in the list
  4. Right-click > Suspend Process

In Windows 10 1903, Tamper Protection was added.
Tamper Protection must be disabled before changing Group Policy settings, otherwise these are ignored.

  1. Open Windows Security (type Windows Security in the search box)
  2. Virus & threat protection > Virus & threat protection settings > Manage settings
  3. Switch Tamper Protection to Off

To permanently disable real-time protection:

  1. Open Local Group Policy Editor (type gpedit.msc in the search box)
  2. Computer Configuration > Administrative Templates > Windows Components > Microsoft Defender Antivirus > Real-time Protection
  3. Enable Turn off real-time protection
  4. Restart the computer

To permanently disable Microsoft Defender:

  1. Open Local Group Policy Editor (type gpedit.msc in the search box)
  2. Computer Configuration > Administrative Templates > Windows Components > Microsoft Defender Antivirus
  3. Enable Turn off Microsoft Defender Antivirus
  4. Restart the computer
13
  • Regedit.exe
  • HKEY_LOCAL_MACHINE\SOFTWARE\Policies\Microsoft\Windows Defender
  • New > DWORD DisableAntiSpyware
  • Set it to 1
  • Reboot

If it doesn't work then one more step:

  • Regedit.exe
  • HKEY_LOCAL_MACHINE\SOFTWARE\Policies\Microsoft\Windows Defender\Real-Time Protection (create this key if not existing)
  • New > DWORD DisableBehaviorMonitoring; set it to 1
  • New > DWORD DisableOnAccessProtection; set it to 1
  • New > DWORD DisableScanOnRealtimeEnable; set it to 1
  • Reboot

You can also save the code below to disable_realtime_protection.reg and run

Windows Registry Editor Version 5.00

[HKEY_LOCAL_MACHINE\SOFTWARE\Policies\Microsoft\Windows Defender] "DisableAntiSpyware"=dword:00000001

[HKEY_LOCAL_MACHINE\SOFTWARE\Policies\Microsoft\Windows Defender\Real-Time Protection] "DisableBehaviorMonitoring"=dword:00000001 "DisableOnAccessProtection"=dword:00000001 "DisableScanOnRealtimeEnable"=dword:00000001

7

I tried all suggestions here prior to today and tried this, this, this.

The only thing that works right now, Jan 2021, is a version of this. I have to run this every time I boot Windows 10. Sometimes even during the day, Defender will enable itself. Argh! So i have to run it again. Because of all this manual labor, I set up a Shortcut Key Ctrl + Shift + Alt + F12 to run the disable command. After pressing that shortcut I have to still answer Yes to the "Allow this program to make changes" dialog.

Steps

  1. Right click on your desktop then select New then Shortcut. Leave this on your desktop so that Windows finds the shortcut key.
  2. In the Target box type this code.
C:\Windows\System32\WindowsPowerShell\v1.0\powershell.exe Set-MpPreference -DisableRealtimeMonitoring $true
  1. In the Shortcut key box press any key you want to use to run this shortcut. I used Ctrl + Shift + Alt + F12.

enter image description here

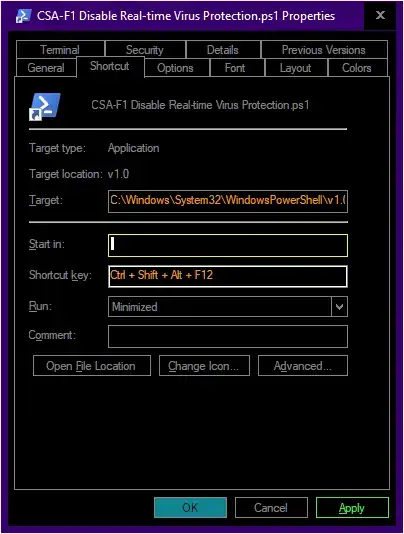
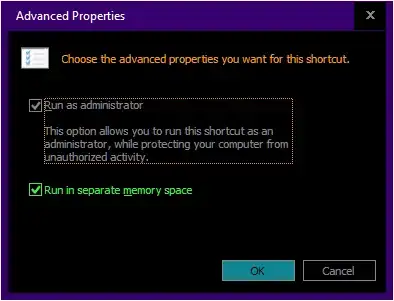
  1. Press Advanced then enable Run as administrator.

enter image description here

  1. Press OK twice. You're done.

You should know that Windows will keep annoying you with notifications to turn on virus protection. It's non stop madness ... in the battle to reclaim CPU power from the sharp clutches of Mr. Evil Real-time Defender of MS. Just ignore it.

I hope MS sees this and fixes this because it's so obtrusive of them to force real-time defender on all the time. It grinds my fast computer to a crawl.

Saj
  • 181
  • 1
  • 2
2

Many Settings aren't allowed to change during the normal usage. It is neccessary to start Windows in the safe Mode, now you are safe to do all the *** Win does not allow. Just kidding be careful, like changes at the registry.

How to start safe mode?

  1. Windowskey + R
  2. enter "msconfig"
  3. Select start at the top registers
  4. Check "Safe Mode" at Startoptions-Panel
  5. Accept or OK and restart

Now all the changes mentioned before can be done. Same procedure to start windows in normal Mode but just uncheck "Safe Mode"

(Unfortunetly I need 50karma Points to write a comment, so this goes here)

1

MS has no longer supportted DisableAntiSpyware, they use many tricks to protect MsMpEng.exe and related registry item.

If you actually want to disable Windows Defender, using WinPE or WRE to edit registry offline.

--------------------------------------------------------------------------
Windows Registry Editor Version 5.00

[HKEY_LOCAL_MACHINE\SOFTWARE\Microsoft\Windows Defender] "DisableAntiSpyware"=dword:00000001 "DisableAntiVirus"=dword:00000001


These items are protected online, so you cannot modify them, that's why using WinPE or WRE.

1

I found this utility very useful against Windows Defender and it works on my latest version of windows 10 machine.

enter image description here

According to their official creator Defender Control is a portable tool featured within a simplistic UI that permits you to one-click disable/enable or even launch Windows Defender. The need to disable Windows Defender can help speed up the overall time when you find yourself copying large amounts of data to and from your PC or USB or having a conflict between Windows Defender and another type of antivirus solution. It can also benefit users with a machine that is a little light on resources or have a top-notch alternative installed.

0

Based on all previous answers. New and main thing is updating group polices immediately by command promt gpupdate /force

Approved in the case of Windows 10 21H2 LTSC.

In Windows Security (type Windows Security in the search box)

Under Virus & threat protection > Virus & threat protection settings > Manage settings

  • Switch all items to off

In Local Group Policy Editor (type gpedit.msc in the search box)

Under Computer Configuration > Administrative Templates > Windows Components > Microsoft Defender Antivirus > Real-time Protection

  • Enable "Turn off real-time protection"
  • Disable "Turn on behavior monitoring" (not necessary)
  • Disable "Turn on process scanning whenever real-time protection is enabled" (not necessary)

In CMD (type cmd in the search box)

  • Promt gpupdate /force

Now PC can be restarted with Defender disabled after startup

LCDM
  • 1
-1

For anyone coming here from the the FLARE-VM installation guide (or video) and trying to install on Windows 11 (24H2), the steps are different to permanently disable Microsoft Defender on Windows 11. I found the process at the below URL to work. You will need to boot into safe mode.

https://woshub.com/disable-windows-defender-antivirus/#:~:text=To%20completely%20disable%20Windows%20Defender%20Antivirus%20on%20Windows%2011%2C%20you%20need%20to%20boot%20your%20computer%20to%20Safe%20Mode.