First step, select your icon
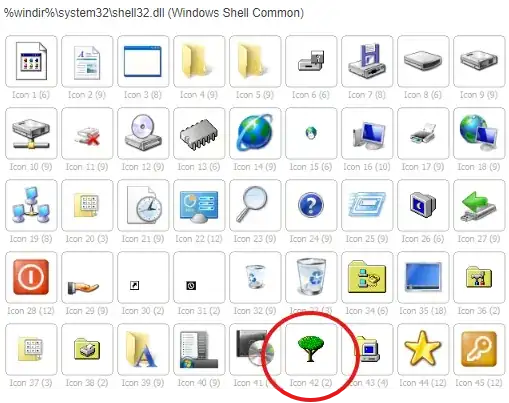
First you need to understand where the default icons come from. They are stored, as the path suggests, in the file %SystemRoot%\System32\SHELL32.dll. They are other files that also contain icons, you can go check them over here : Windows Icons: Full list with details, locations & images
Next, you need to know which icon you what to use for your disk. Go to the link above and select your favorite icon. Remember the dll file you selected and the icon number for the next steps. Here it is the shell32.dll file and icon 42.
Screenshot of the website describing the Windows icons
Next, we can set this icon as a disk icon in two ways.
The simple way, create an autorun.inf file
If you meddled with USB drives you should be familiar with this one. Simply create a file named autorun.inf at the root of the disk, open it with your favorite text editor to add the following content :
[autorun]
icon="%WINDIR%\system32\shell32.dll,41"
Don't forget to substract 1 from the icon number you selected or it will take the wrong one ! In this example, the tree was icon 42 so I write down 41.
After this, reboot your computer and the disk should have the right icon !
The sexy way, editing the Windows registry
The big drawback of the previous method is that you have a to create a file at the disk root, it's ugly and simply won't do !
This method will explain to you how to achieve the same result without creating an extra file.
Please be aware that changing the registry can be dangerous if done wrong, feel free to export the registry current state in case anything happens.
- Press Win+R, type
regedit and click OK
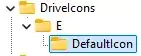
- Navigate to
HKEY_LOCAL_MACHINE | SOFTWARE | Microsoft | Windows | CurrentVersion | Explorer | DriveIcons
- Create a new key by right clicking
DriveIcons, selecting New > Key and name it after the drive letter (e.g. E)

Create new key
- Within this drive letter key create another new key and name
DefaultIcon
Final folder tree
- Double click the default value and in the new window insert the same line as the
autorun.inf file ("%WINDIR%\system32\shell32.dll,41") and click OK :
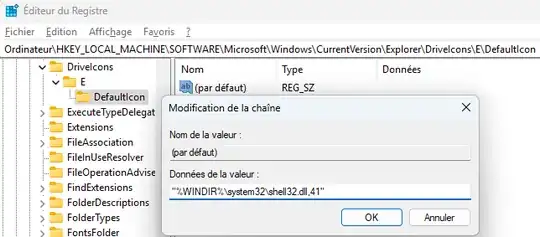
Don't forget to substract 1 from the icon number you selected or it will take the wrong one ! In this example, the tree was icon 42 so I write down 41.
And there you have it ! You don't even need to restart your computer.
 Screenshot of the disk on my computer, the last with a custom icon
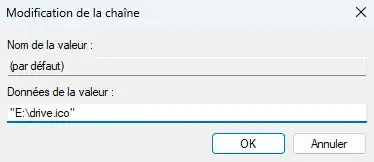
Can I use a custom .ico instead of a Windows icon ?
Of course, take any of the methods above and write the path to the .ico file instead of the shell32 path.
Autorun method :
[autorun]
icon=drive.ico
Registry edit method :
 On the left a classic folder properties and on the right a disk properties


