I downloaded a 30 day trial of Macrium Reflect X and create the rescued media on a MBR partitioned 1 TB FAT32 formatted external drive. The media was installed to be both BIOS and UEFI booting. Below are four possible methods which may solve your problem.
| Note |
| The external drive remains both BIOS and UEFI bootable after completing the changes outlined in all of these methods. |
Method 1: Create a New NTFS Partition on the Drive
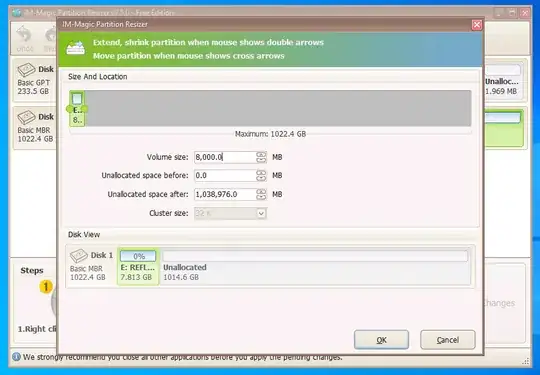
There is free software available which can shrink partitions with FAT32 formatted volumes. I downloaded the free portable version of IM-Magic Partition Resizer Free -100% Freeware. Portable means this product can be used without installing. I selected to shrink the 1 TB FAT32 formatted partition to about 8 GB, as shown below.
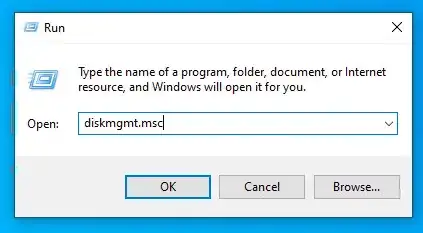
Afterwards, I closed the application and used the Run application to open Microsoft Disk Management, as shown below.
Use Disk Management to create a new maximum size simple volume in the remaining unallocated space. Assign a drive letter. Choose to quick format using the NTFS file system and a Images volume label. ExFAT could also have been chosen. Your results should be similar to what is shown below.
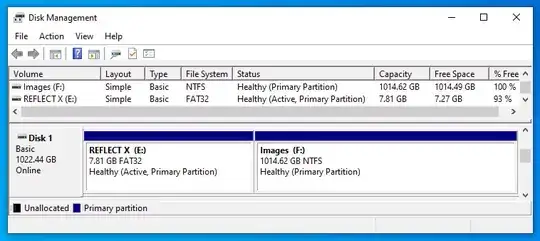
When finished, close Disk Management.
A 400 GB restore image can now be copied to this new NTFS (or ExFAT) formatted volume labeled Images.
Method 2: Convert to NTFS and Use the Rufus Bootloader to UEFI Boot
This method assumes the UEFI firmware in your computer does not have a driver already installed for NTFS volumes.
This method was derived from this discussion thread.
You need to first make the changes outlined in the section below titled Convert to NTFS and Create a New EFI Partition before proceeding.
The Rufus bootloader is needed, I downloaded the bootloader file named bootx64.efi from release v2.5 of the pbatard/uefi-ntfs GitHub repository. In other words, from this release. The release also includes a signed version named bootx64_signed.efi, which can be downloaded, renamed bootx64.efi and used instead.
To install, open a Command Prompt window and enter the following commands. If the volume labeled REFLECT EFI is not drive S:, then make the appropriate drive letter substitutions where necessary.
| Note |
If you used the instructions given in the section titled Convert to ExFAT and Create a New EFI Partition, then substitute exfat_x64.efi for ntfs_x64.efi when entering the commands given below. |
cd /d %userprofile%\Downloads
xcopy ntfs_x64.efi s:\EFI\rufus\
xcopy bootx64.efi s:\EFI\boot\
A 400 GB restore image can now be copied to this new NTFS volume labeled Reflect X.
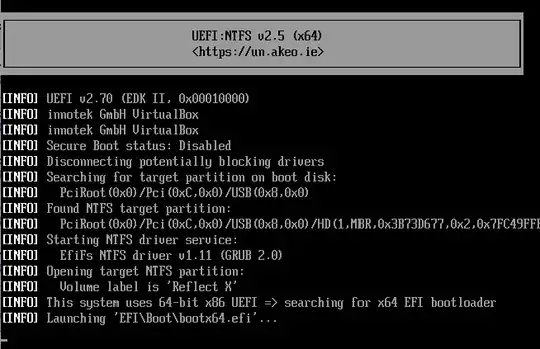
Below is an example of the bootx64.efi output.
Method 3: Convert to NTFS and Use an UEFI Shell to UEFI Boot
This method assumes the UEFI firmware in your computer does not have a driver already installed for NTFS volumes.
You need to first make the changes outlined in the section below titled Convert to NTFS and Create a New EFI Partition before proceeding.
An UEFI shell is needed, I downloaded the UEFI shell v2.2 file named shellx64.efi from release 24H2 of the pbatard/UEFI-Shell GitHub repository. In other words, from this release.
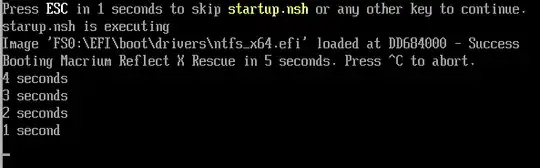
An UEFI shell script is needed. In your Downloads folder, create a new empty file named startup.nsh. Add the following UEFI script to this file.
@echo -off
echo starup.nsh is executing
set -v BootDelay 5
# Set the current filesystem to the mapped
# filesystem labeled "REFLECT EFI".
for %a run (0 99)
  if exist FS%a: then
    ls FS%a:\ -sfo | parse VolumeInfo 2 >v VolumeName
    if "%VolumeName%" == "REFLECT EFI"  then
      FS%a:
      goto AfterLoopA
    endif
  endif
endfor
echo "Error: Missing ^"REFLECT EFI^" volume."
exit /b
:AfterLoopA
# Load all of the file systems drivers.
for %b in \EFI\boot\drivers\*.efi
  load %b
endfor
# Add newly found file system mappings.
map -r > nul
# Change the current filesystem to the mapped
# filesystem labeled "Reflect X".
for %c run (0 99)
  if exist FS%c: then
    ls FS%c:\ -sfo | parse VolumeInfo 2 >v VolumeName
    if "%VolumeName%" == "Reflect X"  then
       FS%c:
       goto AfterLoopC
    endif
  endif
endfor
echo "Error: Missing ^"Reflect X^" volume."
exit /b
:AfterLoopC
# Count down in seconds before booting Macrium Reflect X Rescue.
for %d run (%BootDelay% 1 -1)
  if %d eq %BootDelay% then
    echo "Booting Macrium Reflect X Rescue in %d seconds. Press ^^C to abort."
  else
    if %d ne 1 then
      echo "%d seconds"
    else
      echo "%d second"
    endif
  endif
  stall 1000000
endfor
# Boot Macrium Reflect X Rescue.
\EFI\Boot\bootx64.efi
To install, open a Command Prompt window and enter the following commands. If the volume labeled REFLECT EFI is not drive S:, then make the appropriate drive letter substitutions where necessary.
| Note |
If you used the instructions given in the section titled Convert to ExFAT and Create a New EFI Partition, then substitute exfat_x64.efi for ntfs_x64.efi when entering the commands given below. |
cd /d %userprofile%\Downloads
xcopy ntfs_x64.efi s:\EFI\boot\drivers\
copy shellx64.efi s:\EFI\boot\bootx64.efi
copy startup.nsh s:\EFI\boot
A 400 GB restore image can now be copied to this new NTFS volume labeled Reflect X.
Below is an example of the startup.nsh script execution.
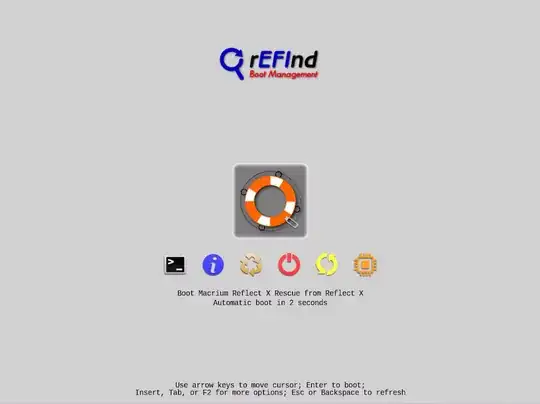
Method 4: Convert to NTFS and Use rEFInd to UEFI Boot
The rEFInd Boot Manager is maintained by Rod Smith, who also happens to be is an user here at superuser.
This method assumes the UEFI firmware in your computer does not have a driver already installed for NTFS volumes.
You need to first make the changes outlined in the section below titled Convert to NTFS and Create a New EFI Partition before proceeding.
Download the latest rEFInd from SourceForge to your Downloads folder. If the file downloaded is not refind-bin-0.14.2.zip, then make the appropriate substitutions below.
To install, open a Command Prompt window and enter the following commands.† If the volume labeled REFLECT EFI is not drive S:, then make the appropriate drive letter substitutions where necessary.
| Note |
If you used the instructions given in the section titled Convert to ExFAT and Create a New EFI Partition, then substitute exfat_x64.efi for ntfs_x64.efi when entering the commands given below. |
cd /d %userprofile%\Downloads
tar -xf refind-bin-0.14.2.zip
xcopy /e /q refind-bin-0.14.2\refind s:\EFI\boot\
xcopy ntfs_x64.efi s:\EFI\boot\drivers\
cd /d s:\EFI\boot
ren drivers_x64 unused_drivers_x64
copy refind_x64.efi bootx64.efi
copy refind.conf-sample refind.conf
Enter the command notepad refind.conf, then add the following lines to the end of the s:\EFI\boot\refind.conf file. When finished, save, then close the Notepad application.
scanfor manual
default_selection "Macrium Reflect X Rescue"
menuentry "Macrium Reflect X Rescue" {
    icon \EFI\boot\icons\tool_rescue.png
    volume "Reflect X"
    loader \EFI\Boot\bootx64.efi
}
Close the Command Prompt window.
A 400 GB restore image can now be copied to this new NTFS volume labeled Reflect X.
Below is an image of the rEFInd menu.
Convert to NTFS and Create a New EFI Partition
| Note |
| I tested to see if Macrium Reflect X Rescue would boot from a NTFS volume. However, I did not test much beyond that point. |
Open an Administrator Command Prompt window and enter the following commands. My Macrium Reflect X Rescue USB FAT32 drive was assigned to drive E:. If your drive was assigned a different drive letter, then make the appropriate drive letter substitutions below.
convert e: /fs:ntfs
label e: Reflect X
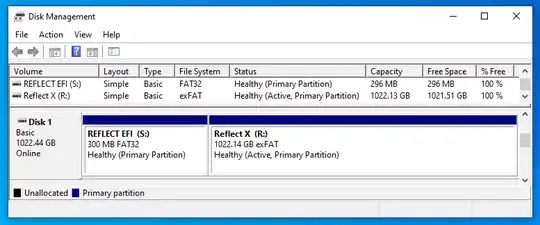
Close the Administrator Command Prompt window. Use the Run application to open Microsoft Disk Management, as shown below.
Use Disk Management to complete the following three steps.
- If available, assign the drive letter
R to the volume labeled Reflect X. If drive letter R is unavailable, then leave unchanged. If the assigned drive letter differs from R, then make the appropriate drive letter substitutions where necessary.
- Shrink the volume labeled
Reflect X by 300 MB.
- In the unallocated space, create a new maximum size simple volume. Assign the drive letter
S if available, otherwise some other letter. If the assigned drive letter differs from S, then make the appropriate drive letter substitutions where necessary. Choose to quick format using the FAT32 file system and a REFLECT EFI volume label.
Your results should be similar to what is shown below.
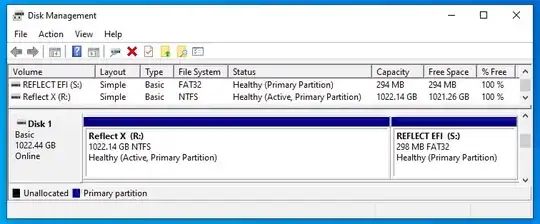
When finished, close Disk Management.
A UEFI NTFS driver will be needed. I downloaded the current of driver ntfs_x64.efi from this Akeo Consulting website to my Downloads folder. The current version at the time of this posting was v1.11.
Convert to ExFAT and Create a New EFI Partition
This section can be substituted for the previous section titled Convert to NTFS and Create a New EFI Partition.
| Note |
| I tested to see if Macrium Reflect X Rescue would boot from an ExFAT volume. However, I did not test much beyond that point. |
Open an Administrator Command Prompt window and enter the following commands.† My Macrium Reflect X Rescue USB FAT32 drive was assigned to drive E:. If your drive was assigned a different drive letter, then make the appropriate drive letter substitution below.
cd /d %userprofile%\Downloads
tar -cf ReflectXRescue.tar e:\*
Use the Run application to open Microsoft Disk Management, as shown below.
Use Disk Management to complete the following three steps.
- Delete the volume containing Macrium Reflect X Rescue.
- In the unallocated space, create a new 300 MB simple volume.
Assign the drive letter
S if available, otherwise some other letter. If the assigned drive letter differs from S, then make the appropriate drive letter substitutions where necessary. Choose to quick format using the FAT32 file system and a REFLECT EFI volume label.
- In the remaining unallocated space, create a new maximum size simple volume. Assign the drive letter
R if available, otherwise some other letter. If the assigned drive letter differs from R, then make the appropriate drive letter substitutions where necessary. Choose to quick format using the exFAT file system and a Reflect X volume label.
Your results should be similar to what is shown below.
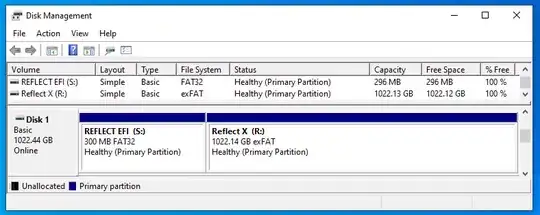
When finished, close Disk Management.
In the Administrator Command Prompt window, enter the following commands.†
cd /d %userprofile%\Downloads
diskpart
select volume r:
active
exit
tar -xpf ReflectXRescue.tar -C r:\
Close the Administrator Command Prompt window. If you open Disk Management, then your results should be similar to what is shown below. (Basicly, drive R: will now be shown as Active.)
When finished viewing, close Disk Management.
A UEFI ExFAT driver will be needed. I downloaded the current of driver exfat_x64.efi from this Akeo Consulting website to my Downloads folder. The current version at the time of this posting was v1.11.
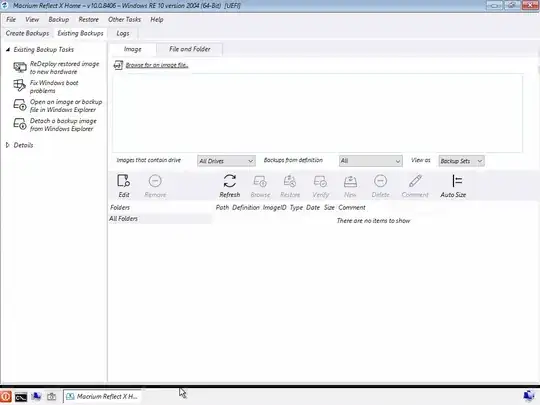
A Screen Shot of Macrium Reflect X Rescue
Alternative UEFI Shells
If you computer has a builtin UEFI shell, then you may not need to install a UEFI 2.2 shell. Instead, try booting from the internal UEFI shell instead.
I also tested the following UEFI 2.2 shell. I downloaded the edk2/ShellBinPkg/UefiShell/X64/Shell.efi file from branch UDK2018 of the tianocore/edk2 GitHub repository to my Downloads folder. In other words, this file.
Note: This file is named Shell.efi and the one used in Method 3 is named shellx64.efi. If you use this alternative file, then make make the appropriate file name substitutions when entering the commands given in Method 3.
An Alternate UEFI NTFS Driver for rEFInd
You should read the website The rEFInd Boot Manager: Using EFI Drivers before deciding to use the NTFS driver describe in this section.
Below are the instructions replacing the existing UEFI NTFS driver with the driver from rEFInd version 0.11.4.
Go to rEFInd version 0.11.4 and download refind-bin-0.11.4.zip to your Downloads folder.
To install, open a Command Prompt window and enter the following commands.† If the volume labeled REFLECT EFI is not drive S:, then make the appropriate drive letter substitutions below.
| Note |
rEFInd loads its own drivers from the s:\EFI\boot\drivers_x64 folder. All other drivers to be loaded by rEFInd should be placed in the s:\EFI\boot\drivers folder. |
cd /d %userprofile%\Downloads
tar -xf refind-bin-0.11.4.zip
xcopy refind-bin-0.11.4\refind\drivers_x64\ntfs_x64.efi s:\EFI\boot\drivers_x64\
ren s:\EFI\boot\drivers unused_drivers
Close the Command Prompt window.
Comment on the Correct Partition Type Id for EFI System Partitions on a Drive with a MBR Partitioning Scheme
Technically, EFI system partitions are suppose to have a partition type id of EF. When Macrium Reflect X creates a rescue drive, an id of 0B is used. The EFI system partitions created in this answer default to an id of 0C. If by some small chance your computer will not recognize an EFI system partition, then you may want to try a different id.
†For documentation on the use of the tar command, see this answer.


