27

I know this sounds weird, but I have several 64 GB USB flash drives, and I need to store a 100 GB file, which exceeds the storage capacity of a single USB flash drive. Is there a way to combine these two USB flash drives into a single logical partition that would appear as one larger disk?

Please note that I am using Debian Linux instead of Windows.

I am always going to work with both USB flash drives connected to my laptop, and I will not access the file with only one usb plugged in.

To clarify my question, let me give an example. For instance, I have a file that contains the data of the following:

1234567890, and I would like to split the file to 12345 and 67890 if each USB flash drive can only hold 5 chars of data. But the file is only accessible if 2 USB flash drives are plugged in simultaneously.

Giacomo1968
  • 58,727
Max
  • 526

9 Answers9

36

What you want to achieve might be done by splitting an archive into smaller parts. It depends on whether you need direct access to your 100 GB file or if it's solely for archival purposes. If it's the latter, this approach could be helpful.

For this example I'm using 7-Zip to create a tar file, split into 100 MB chunks:

enter image description here

This also works for other archive formats, like zip or 7z.

Here I've split some_large_file.iso (1.04 GB) into 100 MB chunks:

enter image description here

In your case you would split your file into 64 GB units (64G). Depending on the actual size of your USB sticks, you might have to reduce this size somewhat.

Velvet
  • 1,739
28

If "logical partition that would appear as one larger disk" is not a strict requirement then you can use Btrfs.

First decide if you want to commit whole USB sticks to the filesystem you are going to create, or if you want to create a partition table on each. The latter method is more canonical, the former method is simpler.

Most commands in this answer need root access. For brevity I do not include sudo explicitly in the commands. Use sudo where needed.

Let's assume the devices you want to use are /dev/sdx and /dev/sdy. Just in case run wipefs -a /dev/sdx /dev/sdy, so the devices appear clean.

If you want to use partitions rather than whole devices then create one big partition per device (with fdisk, gdisk or a similar tool). If your tool of choice asks you if it should create a new filesystem, decline. If the tool finds an old signature and asks you if it should erase it, affirm. After creating partitions (say /dev/sdx1 and /dev/sdy1), just in case you may run wipefs -a /dev/sdx1 /dev/sdy1, so they appear clean for sure.

Now create a Btrfs on the devices. It will be either

mkfs.btrfs -d single -m dup /dev/sdx /dev/sdy

or

mkfs.btrfs -d single -m dup /dev/sdx1 /dev/sdy1

depending on if you want to use the whole devices or the partitions.

This will not create a "logical partition that would appear as one larger disk"; I mean there won't appear any /dev/something you can access on the block level. Still, a larger filesystem will be created and ready to be mounted.

To mount the filesystem, mount any of its devices, no matter which one. If the kernel knows which other devices belong to the same filesystem then it will use them properly. If any of the devices is missing (really missing or "missed" by the kernel) then the kernel will not let you mount the filesystem. Just after creating the filesystem the kernel should know the devices and mounting should work straightforwardly. After a reboot or after (re)connecting the device(s) to the same or another Linux you may need to run btrfs device scan first, to make the kernel examine all devices and learn what Btrfs is where. There is no harm in running btrfs device scan even if the kernel already knows; so when in doubt, just run it.

This is how you mount:

mount /dev/sd… /path/to/mountpoint

where sd… is one of the devices that belong to the filesystem. In our example it can be sdx or sdy (if the filesystem is on these whole devices), or sdx1 or sdy1 (if the filesystem is inside these partitions).

You unmount in the most regular way:

umount /path/to/mountpoint

Notes:

  • To store even larger files, you can use three or more devices with mkfs.btrfs in the first place; or you can add a device to Btrfs later with btrfs device add … (see man 8 btrfs-device).

  • You can use whole devices, partitions and/or even regular files* as "devices" committed to Btrfs. You can mix these types.

    * In case of regular files, you need to create loop devices (with losetup) before btrfs device scan.

  • The comment that says "USB flash drives are notoriously unreliable and you'll be doubling the chance something goes wrong" is basically right. I'm giving you a way to do what you want because it's possible. Personally I would use Btrfs on multiple USB flash drives only for short-term (ad hoc) storage of expendable data.

21

Use split to split the files:

split -b 60G filename

Will give you filename01 and filename02. To restore original simply do

cat filename01 filename02 > filename
vidarlo
  • 540
21

On Linux? Yeah, it's easy (for certain values of "easy" - I wouldn't want to have to walk my elderly mother-in-law through this over the phone - but as copy/paste? Not bad).

First, plug in all the USB's you want to use.

Second, list them all out: ls /dev/disk/by-id (if your distro doesn't use that particular set of links, that's OK; run ls /dev/sd* before you plug the USB's in, then run it again maybe five seconds after - the "new" entries are the USB's).

Create the RAID array: sudo mdadm --create --verbose /dev/md0 --level=stripe --raid-devices=[number of USBs] [listing of the block devices from above]

Format the RAID array. I'm using ext4 here, but any format your OS supports will do fine: sudo mkfs.ext4 /dev/md0

Make a mount point: mkdir -p [anywhere on the FS you want, maybe /home/[your username]/myMount or /dev/shm/myUSBRaid]

That done, you can now mount the array: sudo mount /dev/md0 [mount point from above]

...and make sure you can access it: sudo chown [your username] [mount point from above]

...and then it's just a chunk of file system like any other. Copy away! When you're done, unmount it: sudo umount /dev/md0

A note: The /dev/md0 may change after you unplug/replug the USB's - but it should always be /dev/md[something] so you can look it up via ls /dev/md*

13

I have summarize the answers and comments, and I have came up with 2 main solutions. The first solution is a safest but it is kind of complex, the third one, however, sticks to the origin question:

Solution 1: Creating a LVM Logical Volume across several flash drives

Thank you for @GlennWillen for the comment for the link and the reminder.

Note: The following steps are copied from the website

Step 1 – Create a Partition on each of the USB Flash Drives

Before starting, remember to plug all four usbs in

$ sudo fdisk /dev/sdb

Welcome to fdisk (util-linux 2.37.2). Changes will remain in memory only, until you decide to write them. Be careful before using the write command.

Command (m for help): p Disk /dev/sdb: 1.87 GiB, 2002780160 bytes, 3911680 sectors Disk model: Flash Disk Units: sectors of 1 * 512 = 512 bytes Sector size (logical/physical): 512 bytes / 512 bytes I/O size (minimum/optimal): 512 bytes / 512 bytes Disklabel type: dos Disk identifier: 0x6a5f5bac

Command (m for help): n Partition type p primary (0 primary, 0 extended, 4 free) e extended (container for logical partitions) Select (default p): p Partition number (1-4, default 1): First sector (2048-3911679, default 2048): Last sector, +/-sectors or +/-size{K,M,G,T,P} (2048-3911679, default 3911679):

Created a new partition 1 of type 'Linux' and of size 1.9 GiB.

Command (m for help): p Disk /dev/sdb: 1.87 GiB, 2002780160 bytes, 3911680 sectors Disk model: Flash Disk Units: sectors of 1 * 512 = 512 bytes Sector size (logical/physical): 512 bytes / 512 bytes I/O size (minimum/optimal): 512 bytes / 512 bytes Disklabel type: dos Disk identifier: 0x6a5f5bac

Device Boot Start End Sectors Size Id Type /dev/sdb1 2048 3911679 3909632 1.9G 83 Linux

Command (m for help): w The partition table has been altered. Calling ioctl() to re-read partition table. Syncing disks.

Step 2 – Create the LVM Physical Volumes (PVs)

Once the drives are ready, we will create the PVs on the USB flash drives. There is a 1:1 mapping between the PVs and the partitions.

Since each USB flash drive was configured to have one partition that spans the entire disk, no partition devices (e.g. /dev/sdb1) will appear. We can then create the PVs on the “raw” device itself:

$ sudo pvcreate /dev/sdb /dev/sdc /dev/sdd /dev/sde
Physical volume "/dev/sdb" successfully created.
Physical volume "/dev/sdc" successfully created.
Physical volume "/dev/sdd" successfully created.
Physical volume "/dev/sde" successfully created.
Step 3 – Create the LVM Volume Group (VG) using the PVs

In this step, we will group the PVs together into one VG. This layer is important as it abstracts away the physical disks (represented by their corresponding PVs), enabling some of the key benefits of using LVM, such as resizing by adding/removing physical disks while the volume is in use.

$ sudo vgcreate vg00 /dev/sdb /dev/sdc /dev/sdd /dev/sde
Volume group "vg00" successfully created
Step 4 – Create the LVM Logical Volume (LV) using the VG

For the final LVM step, we will create a logical volume that uses the VG vg00 that we created in the previous step:

$ sudo lvcreate -n my_volume -l 100%FREE vg00
Logical volume "lv01" created.
Step 5 – Create the File System and Mount it

The LVM Logical Volume behaves similarly to a block device – we need to install a filesystem and mount it before we can use it: $ sudo mkfs.ext4 /dev/mapper/vg00-lv01

$ sudo mount -t ext4 /dev/mapper/vg00-lv01 <PATH TO MOUNT POINT>

Solution 2: Split the file into half and re-combine it when using it.

Thank you for @vidarlo for the answer and the suggestion.

  • Use split to split the files:

    split -b 60G filename
    

    Note that -b is the size byte per output file
    Will give you filename01 and filename02.

  • To restore original simply do:

    cat filename01 filename02 > filename
    

Solution 3: Using RAID technology

RAID (Redundant Array of Independent Disks) is a technology used to combine multiple storage devices (like hard drives or USB flash drives) into a single logical unit. It can provide performance benefits, redundancy, or both, depending on the RAID level used.

Extended solution: Zip the folder and store it by parts

Thank you for @velvet for the answer for the answer and suggestion

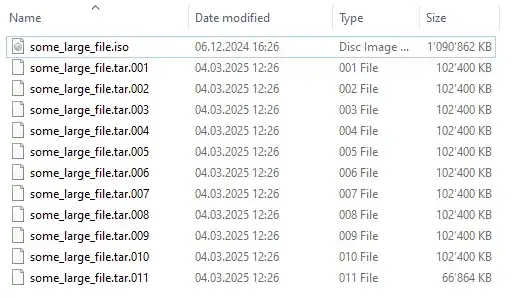
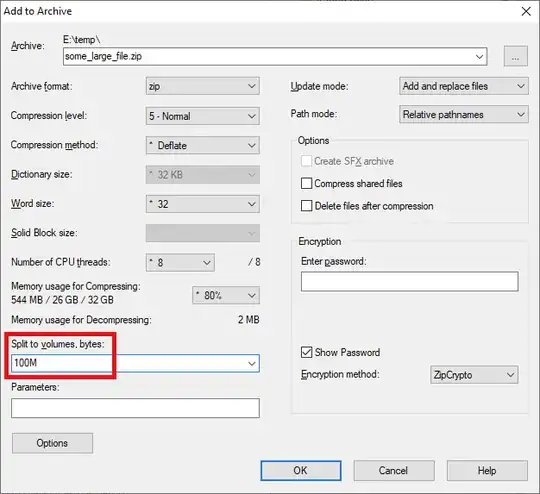
Another solution is to use 7-zip to split the archive file and create a .tar file.

Use 7z to zip the file to chunks of 100MB (or whatever you want)

enter image description here

Result

enter image description here

Max
  • 526
5

The Windows equivalent appears to be JBOD and a search for "JBOD Linux" returns a few possibly useful results. One of them is a post to Ask Ubuntu which suggests to use Fuse (link to Fuse in linked site) specifically as an answer to using JBOD on Linux.

I'm not competent enough to validate that answer, but that answer was accepted by the original posting party for his purposes.

There were other results that I did not pursue and are left as an exercise to the reader.

Giacomo1968
  • 58,727
fred_dot_u
  • 2,902
  • 1
  • 15
  • 10
4

In the comments, you mentioned that your target file is a Quicktime .mov. If it just so happens that your intended use for this Quicktime file is to view it as an uninterrupted, cinematic masterpiece with no need for user interaction (including any instance of seeking), and it is also encoded in a high enough quality to demand all 100 of those GB it's taking up, and you are playing the video on software that does not support seamless transitions between items in a playlist, then you will need to retain the 100 GB file and this solution will not apply to you. It will also not apply if, despite it being an .mov, you need to keep the exact bits (such as if the video is 24 uninterrupted hours of security camera footage that you are reviewing as forensic evidence).

Otherwise, my recommended solution is to split the .MOV file into multiple working video clips, or to reencode the video so that it fits inside 64 GB.

This can be done by using ffmpeg to convert the .mov into a Matroshka file (optionally applying options to lower the resolution and bitrate):

ffmpeg -i your-video.mov your-video-intermediate.mkv

and then using mkvmerge to split the file into smaller chunks:

mkvmerge -o your-video.mkv --split 60g your-video-intermediate.mkv

Each of those two chunks is then stored on separate drives.

3

If you just want read-only access to a 100GB file and it is somewhat compressible, you might try running mksquashfs on it to see if it can compress small enough to fit on one disk. If so, you can mount the squashfs off a thumb drive where you need to use it. Expect mksquashfs to take a long time.

David G.
  • 314
1

In comments, you mention that your file is a Quicktime .mov. Another answer suggests using the 'split' tool to create file fragments that fit on each USB flash drive, but that presents the issue of playback.

There are some additional shenanigans one may enact with the device-mapper driver to create a sort of virtual file to permit read-only access to play the split movie fragments in situ. By creating block devices, this method is seekable (does not use pipes) so one may scrub both directions through the movie as it plays, and this method avoids: needing to cat or pipe the split fragments; or modify the .mov file beyond splitting it; or create any temporary files; or needing to uncompress into a new space to access; or RAID (enough said); etc.

  • The wisdom of actually using dmsetup in this manner is left as an exercise for the implementor.

  • However, this approach is fun, and the split files remain accessible and unmodified.

Step 1: Split the file 'big-movie.mov' in twain

split -b 50G -d -a 2 big-movie.mov big-movie.mov_chunk

This will get you:

big-movie.mov_chunk00
big-movie.mov_chunk01
  • Be sure to specify the split size as 50G binary-gibibytes (53,687,091,200 bytes) and not 50GB SI-decimal-gigabytes (50,000,000,000 bytes), or it will throw off the sector alignments later.

Step 2: Copy the split files to your USB flash drives

  • Using multiple USB flash storage devices isn't great for reliability, but we'll assume you have reasons.
cp big-movie.mov_chunk00 /mnt/usb1/
cp big-movie.mov_chunk01 /mnt/usb2/

Step 3: Pad the tailing partial sector

  • We'll need to copy and pad out the tailing partial sector of the last chunk, or we won't be able to map and read it. (losetup will actually just truncate it.)

  • As far as I know, this appears to be an unavoidable consequence of mapping files to back block devices - which is admittedly a bit of a hacky thing to attempt.

# Define files and compute sizes and remainders.
last_chunk="/mnt/usb2/big-movie.mov_chunk01"
last_chunk_size=$(stat --format=%s "$last_chunk")
last_partial_sector_size=$(( last_chunk_size % 512 ))
if [ $last_partial_sector_size -eq 0 ]; then
    echo "Last chunk is a multiple of 512 bytes; no need to pad a trailing sector."
else
    echo "Last chunk is not a multiple of 512 bytes; we need to create and pad trailing sector..."
    last_partial_sector_offset=$(( last_chunk_size - last_partial_sector_size ))
    padded_tail_sector_file="${last_chunk}_paddedtailsector"
# Extract the last partial sector to a new file
dd if=&quot;$last_chunk&quot; bs=1 skip=&quot;$last_partial_sector_offset&quot; count=&quot;$last_partial_sector_size&quot; of=&quot;$padded_tail_sector_file&quot;

# Pad the file to 512 bytes (append with 0s)
truncate -s 512 &quot;$padded_tail_sector_file&quot;

fi

  • NB. blockdev --getsz and dmsetup both operate in 512-byte sectors

  • There is always a chance that your original movie file's size is a perfect multiples of 512-bytes. In that rare case, the padded tailing sector file is unnecessary.

  • It's probably unnecessary anyway, but it's good to be paranoid about data loss on general principles.

Step 4: Find an available loop device for each file and attach it

  • dmsetup works with block devices, so we'll attach the two/three backing files to loop devices first, because loop devices are seekable.

  • losetup should output the next free loop device when run, and only one at a time apparently.

  • For this answer I've used as examples /dev/loop10, /dev/loop11, and /dev/loop12, but replace them with whatever losetup outputs.

First chunk

losetup -f

/dev/loop10

losetup -r /dev/loop10 /mnt/usb1/big-movie.mov_chunk00 --sizelimit $(stat --format=%s /mnt/usb2/big-movie.mov_chunk00)

Second chunk

losetup -f

/dev/loop11

losetup -r /dev/loop11 /mnt/usb2/big-movie.mov_chunk01 --sizelimit $(stat --format=%s /mnt/usb2/big-movie.mov_chunk01)
  • losetup may warn you that "the file does not fit into a 512-byte sector; the end of the file will be ignored." That's why we prepared the tailing-partial-sector file.

Tailing-partial-sector chunk

losetup -f

/dev/loop12

if [ $last_partial_sector_size -ne 0 ]; then
    losetup -r /dev/loop12 /mnt/usb2/big-movie.mov_chunk01_paddedtailsector --sizelimit 512
fi
  • All the above attaches each chunk file to its own (read-only) loop device, which now lets us use dmsetup with them.

Step 5: Create the dmsetup device-mapper table

  • Again, replace /dev/loop10, /dev/loop11, and /dev/loop12 with whatever your loop devices are.
echo "0 $(blockdev --getsz /dev/loop10) linear /dev/loop10 0
$(blockdev --getsz /dev/loop10) $(blockdev --getsz /dev/loop11) linear /dev/loop11 0" > /mnt/usb1/dm-table
if [ $last_partial_sector_size -ne 0 ]; then
    echo "$(( $(blockdev --getsz /dev/loop10) + $(blockdev --getsz /dev/loop11) )) 1 linear /dev/loop12 0" >> /mnt/usb1/dm-table
fi
  • Verify the dm-table looks right
cat dm-table
  • It should be something like this, with different numbers, potentially without the third line:
0 409600 linear /dev/loop10 0
409600 136894 linear /dev/loop11 0
546494 1 linear /dev/loop12 0
  • NB. The format here is: <start sector> <num sectors> linear <device> <offset>

Step 6: Create the Virtual Merged Block Device

dmsetup create unchunked_big-movie.mov /mnt/usb1/dm-table
  • This registers the device-mapper table and creates /dev/mapper/unchunked_big-movie.mov

Step 7: Verify

ls -la /dev/mapper/unchunked_big-movie.mov

lrwxrwxrwx 1 root root 7 Mar 13 05:34 /dev/mapper/unchunked_big-movie.mov -> ../dm-0

blockdev --getsize64 /dev/mapper/unchunked_big-movie.mov
  • The output from blockdev should be at least the same size as your original .mov file's size. It will probably 1-to-511 bytes larger due to the trailing zero padding.

  • If all has gone right, you should be able to open and play /dev/mapper/unchunked_big-movie.mov just like the original un-split file.

Teardown:

dmsetup remove unchunked_big-movie.mov
losetup -d /dev/loop10
losetup -d /dev/loop11
losetup -d /dev/loop12

Caveats:

  1. This mapping is ephemeral and will be lost upon reboot. You would need to create a startup script or use a systemd service that recreates the mappings after a reboot.

  2. The size of unchunked_big-movie.mov will be padded to a multiple of 512 bytes. Basically, it'll have extra zeros stuck to the end of it when viewed. These zeros are not present in the split chunk files.

  3. The zero-padding shouldn't cause any problems with simply playing it with mplayer/vlc/etc, at most they might output a warning about them.

  4. You might want to avoid directly using unchunked_big-movie.mov in future workflows. Tools like 'cp' will copy it with the extra zeroed bytes, etc.

    • You can always truncate it back to whatever the original filesize was with: truncate -s <bytesize> unchunked_big-movie.mov

    • If you need to restore the original file, just concatenate the chunks (but not the padded tailing sector, which is already in the last chunk file): cat /mnt/usb1/big-movie.mov_chunk00 /mnt/usb2/big-movie.mov_chunk01 big-movie.mov

  5. The 'unchunked' virtual file is read-only. (losetup can attach backing files as rw, but mainly for the purposes of filesystems etc.)

  6. This method wastes up to almost half a kilobyte of storage as overhead.

rysch
  • 111