There's an image in the VS2010 stock icon pack which is only included as a PNG, which I would like to use as an ICO (I want XP and earlier users to see the icon). How can I convert the PNG into the ICO?
Asked
Active
Viewed 1.1e+01k times
10 Answers
95
The opensource imagemagick convert utility can pack multiple images into one single icon file. It provides image re-sizing to generate multiple size icons, and support various other image manipulation. Imagemagick contains several image handling utilities, is opensource, free to use, available on multiple platforms (Linux, Windows, Mac Os X, iOS) and can be batched easily for example in Continuous Integration pipelines.
In this case, one practical approach is to use the vector svg image format as input, as it can generate consistent images of multiple size (like ico files content).
The first option is a one-liner of convert, allowed since version v7.0.0+:
convert logo.svg -define icon:auto-resize=256,128,48,32,16 icon.ico
The second option is a stepped one, generating various png file in a temporary folder. This approach works on all versions including older ones:
convert icon.svg -scale 16 tmp/16.png
convert icon.svg -scale 32 tmp/32.png
convert icon.svg -scale 48 tmp/48.png
convert icon.svg -scale 128 tmp/128.png
convert icon.svg -scale 256 tmp/256.png
Afterwards, the multiple png files can be packed in the final icon.ico with:
convert tmp/16.png tmp/32.png tmp/48.png tmp/128.png tmp/256.png icon.ico
As a final note: the standalone convert binary is no longer installed by default. On Windows, you must check the (quite explicit) Install legacy utilities (e.g. convert) option. In case you missed it, simply use the slightly longer magick convert command rather than the standalone convert command.
Uriel
- 1,168
45
To convert a PNG file to an ICO file, you can use ffmpeg by running this command (replacing img with the name of your input and output file):
ffmpeg -i img.png img.ico
ffmpeg does not come pre-installed on most machines however and must be installed manually.
Installing ffmpeg on windows
You can follow the download installation here: https://ffmpeg.org/download.html
A simpler alternative would be to:
- Open Microsoft Store
- Install "App Installer"
- Open Command Prompt
- Run the command
winget install ffmpeg - Restart the shell, and you will have ffmpeg
Alternatively, you can use the package manager Chocolatey:
- Install Chocolatey: https://chocolatey.org/install
- Open Command Prompt with administrative privileges
- Run the command
choco install ffmpeg -y
Installing ffmpeg on linux
Run the command sudo apt update && sudo apt install ffmpeg
Installing ffmpeg on MacOS
Run the command brew install ffmpeg
Eric B
- 103
Hemanta at Yolmo
- 569
37
For one-off tasks I usually just cheat: ConvertICO.com .
If you will be doing this fairly often, you may want to consider the free Photoshop plugin.
17
There's also the Paint.NET ICO plugin (plugin now updated for v4.0+).
Download IcoCur.Zip. Unzip the dll and put it in the "FileTypes" folder in the Paint.NET directory.
It will load and save .ico, .cur and .ani files (.ani as of July 29, 2006).
When loading from an icon or cursor file that contains multiple images, you are given a prompt and allowed to choose which image to load. It always bugged me when there would be 3 or so images in an icon file and other image editors would just auto-load the low resoultion 8x8 one or something like that, so I added the feature to choose.
sourcenouveau
- 3,666
14
Yes you can use websites as some people are recommending in their answers but if you learn how to do it right, you can probably do it yourself in the same amount of time it takes to browse to the site, upload the file, wait in the queue and download it again. The disadvantage of using the sites it that you usually can't control the sizes the or image quality of the individual sizes within the icon.
Here's how you do it manually. You can use GIMP which is an open source alternative to Photoshop that can download for from the project's website. No additional plugins will be necessary. Take the PNG you want to convert. It should be at least 128pixels in size but 256+ would be better.
Open said png in Gimp. Your going to make an image with several layers. When you finish each layer is going to be a different size in the finished icon. Here's the layer layout I usually use 256px (optional), 128px, 96px, 64px, 48px, 40px,32px and 24px. You want to have this diversity in sizes because you need to account for all the different zooms the user will have while browsing in explorer. 256 is overkill but why not future proof your icon?
Step 1: import png into gimp. I usually do this by using Open With in windows on the png and selecting gimp. Gimp will do the rest after that. make sure it's the only layer at the moment (delete any background layers if gimp made any).
Step 2: Resize picture to 256x256 (or 128x128 if you don't want to use 256) by clicking the Image menu and selecting Scale Image. If the image you're stating with isn't square, you'll have to crop it before doing the scaling or it will look weird. You can crop by using rectangle select tool (make sure you do a square selection by pressing shift while selecting). When you're done selecting, click on Image menu and select Crop to Selection.
Step 3: Duplicate current layer by selecting the Layer menu and selecting Duplicate Layer. Click Layer menu again and select Scale Layer and resize duplicated layer to new size like 128 or 96 etc.
Step 4: rinse and repeat until you have made your layers all the way to 24px.
step 5: export current drawing as an Icon by clicking on File menu and selecting Export As. When you get the dialog prompt, you want to make sure that you put in the correct extension (.Ico) and gimp will handle the rest.
thebunnyrules
- 690
8
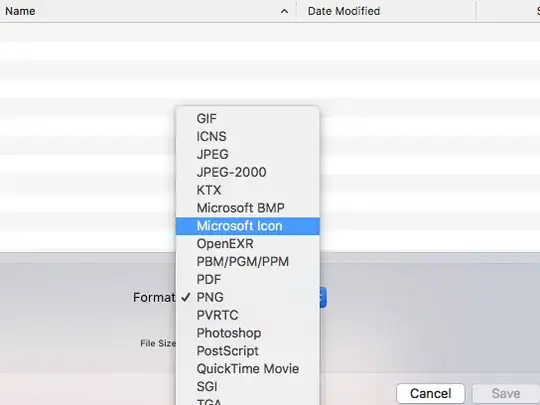
If you are using OSX. You can actually use the built in Preview application to save the file to a pretty broad range of file types.
File → Export... → Hold ⌥ (alt/opt) & click the file Format Listbox
 .
.
Jpatrick
- 199
4
I recommend IcoFX. It was once available as freeware. Luckily, the latest freeware version was preserved, for example here on chip.de.
This is the screenshot as provided by chip.de:

It allows very precise control over all the images in an icon, which is crucial for professional use. A 16x16 icon for example should not be just a downsampled version but a seperate image with reduced details.
You should also provide images with lower bit depth, for use with remote desktop connections.
Unlike other software, where creating multi-resolution icons is based on conventions (like layer names or whatever), IcoFX is very explicit about this. This makes it somewhat easier to use.
By the way: Designing good icons isn’t easy. Make sure to read Microsoft’s guidelines on that.
user219095
- 65,551
2
With the following web service ICOConvert you can create a multi-size Windows icon from different png images.
Wollmich
- 447
1
If you have ImageMagick installed then you can use the convert utility to change png to ico
convert icon.jpg -scale 256 icon.ico
or you could use some online service like freefileconvert.com to convert your file but the only downside of using an online service that I see, is that you can't give custom options e.g., size etc.
ilnli
- 29
1
Use this zsh function:
png2ico () {
    local i="${1}" o="${2:-${1:r}.ico}" s="${png2ico_size:-256}"
    convert -resize x${s} -gravity center -crop ${s}x${s}+0+0 "$i" -flatten -colors 256 -background transparent "$o"
}
Like so:
png2ico input.png
HappyFace
- 1,389