In GIMP 3.0, the old Tile option has been handicapped; it now requires you to use an external calculator tool unless you already know your final image dimensions. Suppose your image is W pixel wide and H pixels tall, and you'd like to create a grid of N images wide and M images tall.
Using Tile
First, you must use your external calculator tool to calculate the new size of your image: W×N by H×M.
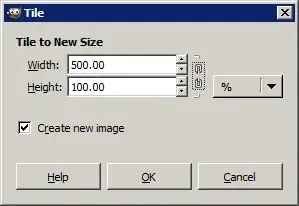
With your new dimensions, you can now go to Filters → Map → Tile. Enter your calculated dimensions and apply.
Using Small Tiles... (only if M = N)
If you do not want to use an external calculator, there is a different approach that works if M = N (i.e. you want an N by N grid of N² tiles).
Unlike the Tile menu, this method only works in-place, replacing your image with the tiles version. You can still Undo every step here, but to preserve your original image in a separate tab, you should duplicate it. You can quickly do this with Ctrl + A, Ctrl + C, then Ctrl + Shift + V.
First, we will scale the image to its final dimensions. Use Image → Scale Image.... Unlike the Tile menu, this menu allows you to enter a math expression. Ensure the chain indicates your dimensions are linked. After the number appearing in the width box, type *N, replacing N with your numerical value for N. Height should follow since it is linked to width. Since we're going to downscale anyway, the Interpolation type does not matter.
Next, use Filters → Map → Small Tiles.... Change Number of Segments to N. Now apply.
The second approach can save you a considerable amount of time because it does not require you to manually calculate the final dimensions of your image. This especially comes in handy if you are repeatedly going back and forth between pre-tile and post-tile iterations, making pre-tile edits that alter image size. If you use the Tile option in such a situation, you will have to repeatedly recalculate image dimensions, which is not always ideal.