10

I want to move the MFT to end of contiguous used space. Right now it is placed at the middle: enter image description here

I want to move it to the beginning. How can I do that?

Bob
  • 63,170

7 Answers7

15

Contrary to other answers, this IS possible, but can be challenging.

Why might you want to do this? Windows often places the MFT in the middle of the disk for historical performance reasons - this can prevent shrinking of a volume as Windows won't shrink the volume beyond un-movable files (of which the MFT is one).

Here's the steps I've just used to move my MFT to allow me to shrink my system volume:

  1. Run Disk Cleanup
  2. Disable System Restore
  3. Disable the page file
  4. Disable hibernation
  5. Run PerfectDisk (free trial is fine for this purpose) - make sure you do a boot-time defrag - this will move the MFT
  6. Run a defrag utility (my preference is Piriform's Defraggler) - after defrag the drive map should now show plenty of free space at the end of the disk
  7. Shrink the volume using the Windows Disk Management utility
  8. Enable hibernation
  9. Enable page file
  10. Enable system restore

Hope this helps!

References:

PerfectDisk

Piriform Defraggler

7

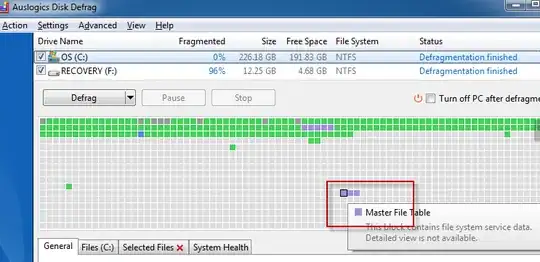
Sysinternals Contig is able to defragment the $MFT file.

When the filesystem is NTFS, contig can also analyse and defragment the following files:
$mft, $LogFile, $Volume, $Attrdef, $Bitmap, $Boot, $BadClus, $Secure, $UpCase, $Extend

Source

Oliver Salzburg
  • 89,072
  • 65
  • 269
  • 311
4

UltraDrefrag does not move it to start (talking about $MFT reserved part), it just only defrag $MFT (talking about used $MFT part).

At least with default options in configuration.

If you know how to tell UltraDrefrag to move $MFT reserved part to the start, please post it.

Oh, by the way... try to do it on a 32GiB VHD / VHDX drive mounted while Windows is working (so no risk and is the better proof of concept of working).

But, finally i found a small tool that moves that $MFT reserved zone to the start of the disk (i had used "compact" and "optimize" options, so not sure which one did the tick), it is called: DiskTuna

That tool also let you fully consolidate free space (much more than most other tools like windows native Defrag, Piriform Defraggler, auslogics DiskDefrag, IOBit SmartDefrag, etc).

And it lets you specificy file list patterns to not move (it is a pitty that pattern list is only for defrag option), so you can make videos, music, etc to stay at end of disk by moving them to the end of the disk (with a different tool like Piriform Defraggler).

Claudio
  • 41
1

I realize this is a fairly old question, however, I recently did the following (dangerous) method on a 32-bit windows 7 virtual machine.

I had a 100GB NTFS partition with (standard) 4k block size. The disk contained just under 10GB of actual data.

  1. Use windows diskmgmt.msc to shrink volume as much as it would go.
  2. Install Defraggler and run a defragment in windows
  3. Do a boot-time defragment with Defraggler (didn't appear to do much, but here as a step which was performed)
  4. Again, shrink the volume as far as possible using diskmgmt.msc (i got an additional ~500mb)
    • At this point, using defraggler or auslogics defragmenter, I couldn't see any files at the end of the disk, but windows refused to shrink past ~54.6GB. I could see the $MFTMirror indicated in both programs at about the 4GB mark. However, all the rest of the data showed as contiguous at the beginning of the disk.
  5. Reboot the computer into Clonezilla live 2.8.1. Perform an image of the partition to another scratch volume using partimage (the default program set)
    • Where exactly is certainly irrelevant, I added a disk to the VM and formatted NTFS 64k blocks to use for this.
  6. Reboot into Windows installation media. Choose recover using tools. Using diskpart remove partition, create a new one at 20GB, format.
  7. Reboot back into Clonezilla. Perform an image restore with the "Disable destination partition size check" option (-icds).
    • In my case, clonezilla restored the image to 99.6% and then said it failed due to a seek error (likely because it couldn't write the last .4% that was outside of the partition boundary).
  8. Reboot back into Windows installation media. Choose recover using tools. Run Diskpart to identify driver letter for the imaged volume.
    • At this point, my volume showed as raw.
  9. Run chkdsk /f : to repair the volume. After this, diskpart identifies the volume as NTFS.
    • In my case, $SDH and $SII appeared damaged/missing. File checking was instantaneous for ~150k files, and checkdisk spent quite some time repairing and rebuilding the file indexes (ymmv for time based on disk performance). At this step, the system was not bootable.
  10. Reboot into Windows installation media again, Choose recover using tools.
    • In my case, at this point, the installation media identified that there would be problems booting the system, and asked if it could fix the problem and reboot. It indicated it was going to backup the boot config, repair the boot database, and add the windows volume detected to the boot configuration.
  11. Reboot the system to the hard disk. -In my case, at this point, I had a working system. Because the indexes above affected were security related, I did a little spot checking with icacls.exe, but permissions appeared to be as normal. (Trusted installer ACEs existed in the windows directory, c:\users had apparently appropriate permissions for the users with profiles)

If this procedure caused a problem, I haven't detected it and the computer boots and runs software fine (not particularly re-assuring, given the chances, I'm sure). Of course, this process more or less throws caution to the wind, so have a backup in case it fails completely on you.

0

For anyone landing here:

If you wish to defragment all system files on all disks I suggest to use this batch file:

@echo off
for %%a in (c d e f g h i j k l m n o p q r s t u v w x y z) do if exist %%a:\ for %%b in ($mft $logfile $volume $attrdef $bitmap $boot $badclus $secure $upcase $extend) do ( title %%a:\%%b & echo ### Processing %%a:\%%b ### & contig64 -v %%a:\%%b )
title Done!
pause
pbies
  • 3,550
0

Okay:

  • you can move the $MFT. It's just a file. Like everything in NTFS
  • What can't be moved it is the file $Boot. This one sector big data snipped, aka VolumenBootRecord (VBR) or boot sector must reside the very beginning (cluster 0 ) of the NTFS-Volume.
  • The only specialty of the MasterFileTable(MFT) is, that it's starts cluster needs to be set in $Boot. Okay some other nice to have constrains its nice if it is first entry(MFT-record) in the $MFT.

Well here is a nice tool to explore (as well as mod) these data structures: https://dmde.com/

Well I've some disk here with an bad sectors. I just managed to make the best as possible copy of it using: ddrescue under Linux. Wonderful tool btw.

The $MFT on this volume is in the range of 'bad sectors'. The end of the volume is good.

Now just for fun I gonna 'relocate' the $MFT. The plan to so is this:

  1. Copy the $MFT
  2. Mount the bad volume (yes this works) and copy back the $MFT to the file myMFT
  3. use DMDE to find out the start cluster of myMFT
  4. write the new MFT-start cluster in $Boot (Sector 0). (And the maybe also the VBR backup at the last sector of the volume)
  5. Run chkdsk and see what it'll do.
  6. Check with DMDE if chkdsk updated the first $MFT entry to also point to myMFT. Check if $MFTMirr was updated also.

I'll edit this post or comment if I succeed. Or what needs to be adjusted

Nadu
  • 276
0

UltraDefrag (Open Source Defragmentation tool for the Windows) have MFT optimization, which processes the MFT only.

Stanislav Prusac
  • 1,244
  • 1
  • 9
  • 5