7

I have a letterhead template and I need the first page left margin to be larger than subsequent pages.

I've seen the option of placing a text box or image box in the header to push the text but this ends up throwing off the tabs and bullet list indentation markers.

I thought of setting up the first page using two columns and pushing the text to start on the second column but I can't seem to find a way to get the text to switch back to 1 column on the second page when it is created from text overflowing.

Does anyone know how something like this is possible?

Thanks in advance, Paul
Paul
  • 71

7 Answers7

6

I know this is an old question, but it came up in my results as I was searching for the answer.

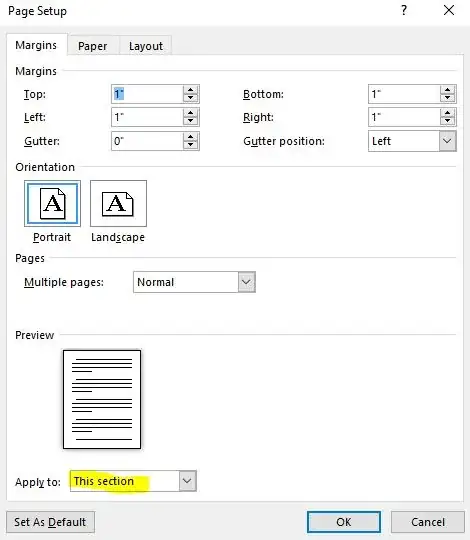
What you need to do is click somewhere on the template where you want the new margins to start to apply, insert a continuous section break, click somewhere below that continuous section break, go to your custom margin settings, and select apply to "this section."

This is a little better than the "after this point" option, because that option inserts a page break section break, which does not work for the OP, because they wanted to keep their template one page long. By inserting a continuous section break instead, you can keep the one-page template and new margins will automatically apply when the user reaches their second page.

Screenshot of margin settings

1

To create a different margins on the first page, go to page setup, click the layout tab, click different first page. I have to do this every year to edit our stationery, and have to look it up each time. Maybe now I'll remember.screenshot showing the different first page menu

0

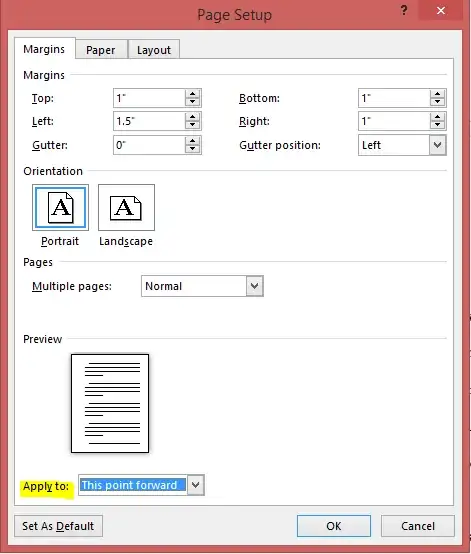
Word 2010+ has the ability to set margins "from this point forward"

  1. set your margins generally
  2. set custom margins on the second page, with "from this point forward" selected.

enter image description here

dbJones
  • 109
0

Not sure if you've worked it out, but I have found that when trying to make the header (or footer) different to the previous page, the only way to stop it affecting the first page (because ticking "different first page" didn't work), I noticed that if you deselect the "Link to Previous" option in the Navigation field to the right of the Options section in the Design ribbon, this worked.

0

Here's a super easy way.

  1. Insert a Section Break (Next Page) from Page Layout > Breaks
  2. Click on the page you want to expand/narrow the margins.
  3. Click on Custom Margins from Page Layout > Margins
  4. In the Page Setup window put in the custom margin size you want then click OK.

Custom Margins with Section Break Next Page

Here's a super hard way.

Which requires your letter head to be a macro enabled workbook.

  1. Setup your first page how you want it with the correct margins.
  2. Create a macro with the below code:

Code:

Sub Document_Open()
    If ActiveDocument.Sections.Count > 1 Then Exit Sub

    Selection.EndKey Unit:=wdStory
    ActiveDocument.Range(Start:=Selection.Start, End:=Selection.Start). _
        InsertBreak Type:=wdSectionBreakNextPage
    Selection.Start = Selection.Start + 1

    With ActiveDocument.Range(Start:=Selection.Start, End:=ActiveDocument. _
        Content.End).PageSetup
        .LeftMargin = CentimetersToPoints(2.54) 'CHANGE THIS it's margin of new pages!
        .SectionStart = wdSectionNewPage
    End With

    Application.OnTime When:=Now + TimeValue("00:00:01"), _
    Name:="CheckPages"


End Sub

Sub CheckPages()
    Application.OnTime When:=Now + TimeValue("00:00:01"), _
    Name:="CheckPages"

    If ActiveDocument.Sections.Count = 1 Then
    ActiveDocument.PageSetup.LeftMargin = CentimetersToPoints(5.54)'CHANGE THIS it's margin of first page!
    End If

End Sub
  1. Save your document.
angelofdev
  • 1,156
0

No - No - No

No different section! Instead use the First-Page Header to change where you can type on the page!

Instead, you place a frame or a textbox in the First-Page Header, to simulate a Margin.

There are tried and true methods of setting up letterhead in Word. Here are two web pages on this:

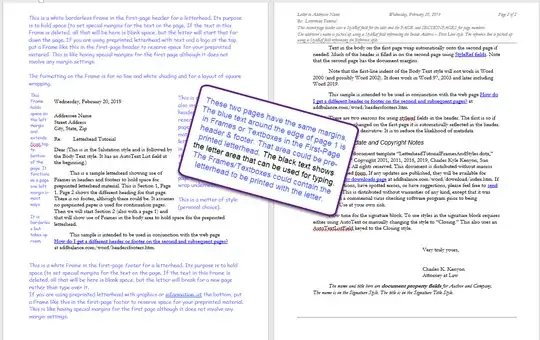
You do not want to be changing the margins because this requires a section break. People using the template will delete that break or continue typing on the first page meaning that the section break will move. Instead, put a Frame or a TextBox in the First-Page-Header (or Footer) that moves text to the right or left (or up or down). The textbox/frame can contain names, etc., or be blank and borderless. The key is that text typed in the body will not overtype it so it acts as a margin.

Here is a screenshot showing page 1 and 2. Both have identical "margins!" The black text shows where text can be typed in the body of the document. Pages 1 and 2 appear to have very different margin settings. They do not.

screenshot

If you like, you can look at samples from my website's download page and use them out of the box or use them as examples. Letterhead Styles and Textboxes Tutorial

0

I looked at this in a different way and I think you can achieve this using a different first page header. Refer to this article which gives detailed steps on how the header can be used to create different margins.

Adam
  • 7,669