45

I've a 27" external monitor connected to my laptop and I use my laptop's screen as secondary. I've both screens turned on while I'm working. When I'm watching movies, I just keep my external monitor on and turn off the lid of the laptop.

I've created a power plan in Power Options called Laptop Screen off which basically does nothing when the lid is off, then I use my external monitor as my only screen.

When I'm working, I activate another power plan which supports high performance for programming and running virtual machines. This power plan puts the laptop to sleep when the lid is closed.

Anyways, I keep switching between these plans depending on what I'm doing. This was all easy in Windows 7/8.1 as I just clicked the battery icon and switched it.

I upgraded to Windows 10 last week and now I've to dig deeper to get there. There should be an easier way? Is there a small tool I can use to do what I'm doing in less no. of steps?

  1. Click battery icon in task-bar --> power and sleep settings

    enter image description here

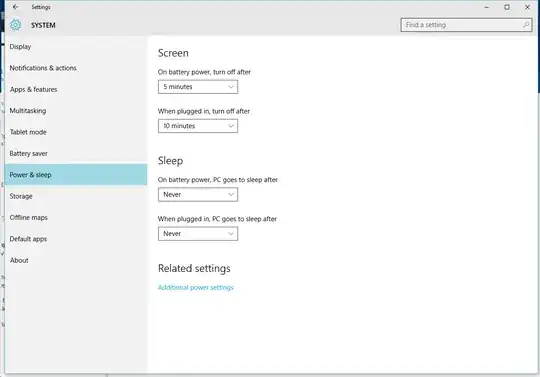
  2. Then additional power settings
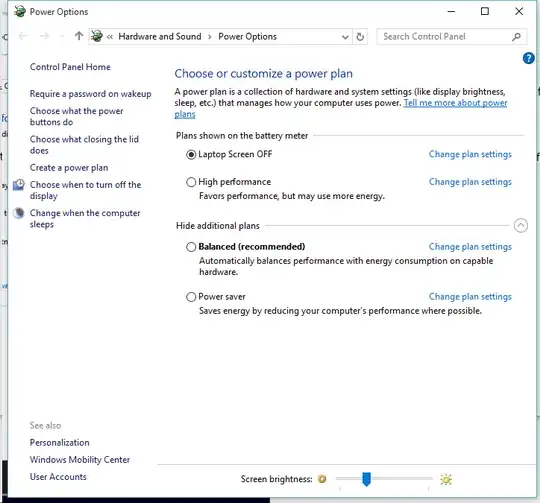
    enter image description here

  3. Switch power plan

clhy
  • 6,514

13 Answers13

60

Open a command prompt and type in the following command:

powercfg /l

This'll show you your powerschemes with their GUID (example:)

Existing Power Schemes (* Active)
-----------------------------------
Power Scheme GUID: 381b4222-f694-41f0-9685-ff5bb260df2e  (Balanced)
Power Scheme GUID: 8c5e7fda-e8bf-4a96-9a85-a6e23a8c635c  (High performance) *
Power Scheme GUID: a1841308-3541-4fab-bc81-f71556f20b4a  (Power saver)

Make a selecton for the GUID you want to work with and right click to copy that text to the clipboard.

Now create a new textdocument and name it for example Scheme - Balanced.cmd (the .cmd is important, what comes before is up to you)

Right-click the file and choose edit.

In the file write:

powercfg /s xxxxxxxx-xxxx-xxxx-xxxx-xxxxxxxxxxxx

where the x's are replaced by the GUID you copied to your clipboard earlier.

So in my example that'd be:

powercfg /s 381b4222-f694-41f0-9685-ff5bb260df2e

Save the file. Now, each time you execute that file, your powerscheme will be set to that scheme.

EDIT: Small note as of 2021. Since a certain version of Windows 10, you may only have the balanced power scheme. If so, you can create the other ones by going into power management, create new plan, and select the High Performance and Power Saver template. No need to make further changes, just Make 2 plans using the templates and name them accordingly, and this answer can then work for you too.

LPChip
  • 66,193
14

I see that there is an accepted answer, but I'll post this also, for those who aren't too comfortable using command prompt or powershell.

You can open Windows Mobility Center and choose the power plan you wish to use under Battery Status. To put it in your task-bar, once you've opened the Windows Mobility Center, right-click on the Task-bar icon and pin to task-bar. Now, it can be accessed with one click.

How to Open "Windows Mobility Center":

  • Method 1: Win+s and search for mobility. Usually it is the first result, Open it, you will be able to select the power plan you want to use.
  • Method 2: Win+r and type mblctr.exe.
  • Method 3: Open Control Panel and go to "Hardware and Sound", under there you should see "Windows Mobility Center".(The methods mentioned previously are much faster though). MobilityCenter
Santa
  • 251
11

The only one that I found working with the latest Windows 10 build was PowerPlanSwitcher, a free, modern-style tray app, which does exactly what you need.

enter image description here

aalaap
  • 730
9

Here's a script that switches between two power plans each time you execute it (in this case "Balanced" and "Power Saver", you can freely choose any 2 power plans to switch between). Remember to put it in a ".cmd" file.

After execution it prints the activated power plan and waits for you to press a key before the console disappears. Here's the code:

@Echo off
setlocal
SET balanced=Power Scheme GUID: 381b4222-f694-41f0-9685-ff5bb260df2e  (Balanced)
Powercfg -getactivescheme > tmp.txt
SET /p active= < tmp.txt
IF "%active%" == "%balanced%" (
Powercfg -s a1841308-3541-4fab-bc81-f71556f20b4a
) ELSE (
Powercfg -s 381b4222-f694-41f0-9685-ff5bb260df2e
)
DEL tmp.txt
endlocal
@Echo on
Powercfg -getactivescheme
PAUSE

Here's what you need to do (see image below to clarify):

  1. Open Command Prompt and run Powercfg /l to get the list of your power schemes.
  2. In the code above you replace the value of the balanced variable with the first of the 2 plans you want to switch between (you need the whole string)
  3. Also replace the GUIDs in the IF - ELSE. The GUID in the "IF" part must be the second power plan you want to switch between; and the GUID in the "ELSE" part must be the the one you also used in the balanced variable.

Hope you can use it! :-)

enter image description here

PS, in case you were wondering: I write the output of Powercfg -getactivescheme to a temp file, read the first line of the temp file into a variable and delete the temp file afterwards. It seemed the easiest way to store the currently active power plan into a variable as I couldn't find a "simple" way to do it directly :-)

Boregore
  • 353
9

Open Run & enter control powercfg.cpl

You can also create a shortcut

enter image description here

to open this window with one click.

enter image description here

clhy
  • 6,514
9

I used Power Buddy in Windows 8 / 8.1 since the default Power Plan Switcher only showed the two most recently used plans. It also seems to work great on Windows 10.

It's a very lightweight tray application, and seems to be developed by a Super User community member: see this answer to How do I display all power plans in Windows 7 notification area?

Filip S.
  • 153
6

Wow! with all respect to all the answers, this should be by far the easiest. Just right click on the Battery Icon in the Task Bar and choose Windows Mobility Center. Super Simple!

For those keyboard shortcut Gods, you can also do Win+X > B

Right-click to Mobility Center

Korayem
  • 236
2

Use BatteryCare http://batterycare.net/en/download.php. It allows you to switch or even automatically switch all your schemes.

jasir
  • 143
2

You might look at the open-source Power Scheme Switcher (MIT License) and test whether it's Windows 10 compatible. Afraid I don't have a Windows 10 system to test on currently, but it's recently-enough developed (VS 2013) that I expect it supports Windows 8.1 so Windows 10 would likely not be a big stretch.

fencepost
  • 1,106
1

Just press Win+X then B

Explanation: Win+X used to open Mobility Center up until Windows 8. Then they changed it to the Modern UI master system context menu. So now this menu shows up. One of the options is Mobility Center. Pressing B will select this option.

1

There's also the "PowerBuddy" application: https://github.com/PerfectlyCromulentLtd/PowerBuddy

Seems like most of these third-party applications haven't been updated in a few years..

Jowdy
  • 11
1

To complement @LPChip's excellent answer, here's how to take it a step further by creating your own Power Scheme switcher menu in order to switch schemes on-the-fly, using only Windows built-in features. No additional software required !

I've built similar menus for other purposes since at least W7; still works on Windows 10 1909 build 18363.904.

  1. Create any number of Power Schemes in the Power Options config pannel, as needed
  2. Create an individual .cmd file for each one of these Power Schemes, as explained by @LPChip, and put them into a folder, preferably with a short name (you'll see why later). I named it "Pwr".

enter image description here

  1. Right-click on the taskbar, go in Toolbar / New toolbar..., then select the folder you just created and click the Select Folder button.

enter image description here

  1. Enjoy your new custom Power Schemes menu!

enter image description here

mach128x
  • 630
0
  1. Create a text file.

  2. Open it.

  3. Put this inside the file:

    setlocal
    SET high_performance=Power Scheme GUID: 8c5e7fda-e8bf-4a96-9a85-a6e23a8c635c  (High performance)
    Powercfg -getactivescheme > tmp.txt
    SET /p active= < tmp.txt
    IF "%active%" == "%high_performance%" (
    Powercfg -s a1841308-3541-4fab-bc81-f71556f20b4a
    ) ELSE (
    Powercfg -s 8c5e7fda-e8bf-4a96-9a85-a6e23a8c635c
    )
    DEL tmp.txt
    endlocal
    
  4. Save the file and rename it "power.cmd"

  5. Open the file. Done!

    However, for some of you the file might still open as a simple text file which means that you have file extensions hidden. To solve this in Windows 10:

Go to any folder

  1. Press tab called "View"
  2. Check the box called "File name extensions"
  3. Go back to the file "power.cmd". Now it is renamed "power.cmd.txt". Rename it "power.cmd" again.
  4. Done! Open the file, your power plan should now switch.