The default location for User Profiles are C:\Users. I would like to move this location to another drive (i.e. D:\Users). I've already been able to customize the library locations, however there are other things that I like to migrate as well. Is there a simple way to change the default location of the User Profiles?
- 26,529
6 Answers
WARNING: Create a backup and a restore point before you try this. I messed up once and had to do a restore myself!
Requires local admin.
Move files that you want to keep from your profile somewhere independent, for example directly on the C: or D: drive
Modify the registry value of
ProfilesDirectoryunderHKEY_LOCAL_MACHINE\SOFTWARE\Microsoft\Windows NT\CurrentVersion\ProfileListto point to your new directory. This will only come into effect for new profilesCreate a temporary user with admin rights on the local computer. This is needed to remove your domain user profile so it can be recreated.
Log out of your account and log into the temporary admin user.
Find Advanced System Settings (for example through Start | Run and typing
sysdm.cpl) and select Settings from the User Profile section.Find the username of your domain user and click the Delete button
I recommend using Switch Accounts rather than logging out of the temporary account. That way, if something went wrong, you still have one account that's working
Switch accounts and log in with your domain user. The profile should now be recreated in the correct location.
- 209
- 2
- 5
I have had a lot of success using an NTFS junction to redirect the Users directory to another drive. I followed this guide: https://lifehacker.com/move-the-users-directory-in-windows-7-5467758 This guide is for Windows 7, but it also works with 10.
One thing to remember, though, when in recovery mode and creating the junction. Make sure that the junction points to the correct drive letter in your Windows installation itself. It may be different in recovery. To keep things in order, I used diskpart to change drive letters to match my installation.
I would also recommend moving just your user's directory. If for whatever reason it's inaccessible you won't be able to log in. In that case, it would benefit having the default administrator account still on C:\.
- 3
- 163
There only one "true" way to doing it - with sysprep. Described here: http://www.tenforums.com/tutorials/1964-users-folder-move-location-windows-10-a.html
But I warn against such actions. Moving user profiles to a non-standard location causes problems with the installation and operation of many programs. Without thinking - MS RSAT does not installs after transfer profiles.
- 742
Came here attacking this problem from a different angle - my local profile directory was removed and I could not recover it - so still technically a profile move issue. The pop-up error dialog I was receiving was "Could not sign-in to local profile" when the directory was corrupted or missing.
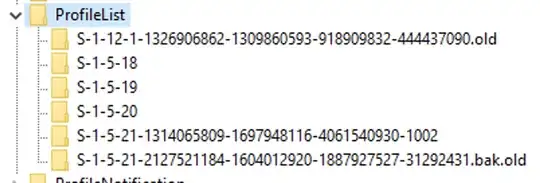
The approach that helped me was renaming the ProfileList entry .old and restarting the machine. After restart I could run sysdm.cpl > Advanced tab > User Profile Settings and delete my temporary profile (<< userid >>.TEMP).
Profile List - Manual Registry Edits
- Registry Hive:
Computer\HKEY_LOCAL_MACHINE\SOFTWARE\Microsoft\Windows NT\CurrentVersion\ProfileList
After removing the profile and restart, I re-added the user account using netplwiz and finally restarting.
Just for those who prepare for the profiles on a second drive before installing Windows 10. Lets say you plan to run Windows off a DOM (Device or Disk on a Module) but want to use for instance a RAID set on another device (D:) for (pro)file storage.
After installation of Windows core finalizes and it reboots to the OOBE (Out Of Box Experience) is the moment to change the profiles from in our case C:\Users to D:\Users.
Follow these steps:
Step zero
Prepare a relocate_profiles.xml response file with this contents
<?xml version="1.0" encoding="utf-8"?>
<unattend xmlns="urn:schemas-microsoft-com:unattend">
    <settings pass="oobeSystem">
        <component name="Microsoft-Windows-Shell-Setup" processorArchitecture="amd64" publicKeyToken="31bf3856ad364e35" language="neutral" versionScope="nonSxS" xmlns:wcm="http://schemas.microsoft.com/WMIConfig/2002/State" xmlns:xsi="http://www.w3.org/2001/XMLSchema-instance">
            <FolderLocations>
                <ProfilesDirectory>D:\Users</ProfilesDirectory>
            </FolderLocations>
        </component>
    </settings>
</unattend>
Step one
At the moment just after reboot at the language select dialog hit Ctrl+Shift+F3. This will reboot into audit mode.
Step two
After the reboot close (cancel) System Preparation Tool. Now you are logged on a temporary Administrator.
Step three
In a command prompt enter this command
C:\Windows\system32\sysprep\sysprep.exe /oobe /reboot /unattend:d:\relocate_profiles.xml
Assuming the xml file is on D: but it can be anywhere even on the installation medium.
Run this and Windows will continue installation and now stores profiles in D:\Users instead of C:\Users. For international users among us Windows Explorer might show these folders as Gebruikers or Benutzer but physically it is all the same folder.
After a couple of weeks using this setup I find that nothing breaks, all menus are working installation of other software works glitch-less.
- 519
So this is actually quite tricky, since moving the whole profile from C to another drive will in most cases make the start menu fail with Critical error your start menu isn't working.
I wouldn't recommend this in any case since a couple of programs which have 'C' drive hardcoded will fail.
The sysprep method is the best, but in case you cannot do this, here's an ugly hack to make so:
- Download Transwiz from https://www.forensit.com/move-computer.html
- Make a backup of the profile to a zip file
- Using regedit, navigate to
Computer\HKEY_LOCAL_MACHINE\SOFTWARE\Microsoft\Windows NT\CurrentVersion\ProfileListand select the SID corresponding to the user you want to move - Change the
ProfileDirectoryvalue to the new location you want your profile to stay - Restore the profile with Transwiz
- Restart your computer and reinstall Windows Apps with the following powershell
Get-AppXPackage -AllUsers | Foreach {Add-AppxPackage -DisableDevelopmentMode -Register "$($_.InstallLocation)\AppXManifest.xml"}
- 111
