Kitchen Remodel/Reshaping the space
|

Reshaping the space
In the case of my own project, the remodel did not just mean a new kitchen, but a reshaping of the space, too – walls and ceiling:
-
 The original space
 -
 After demolition
 -
 After reconstruction
 -
 On completion
If someone is an architect and has an expert spacial sense, they will probably walk through a room and then come up with a new, better and more beautiful shape just like that. But someone who is untrained in architecture may have difficulties to imagine a potential or future space that does not lie directly in front of them. On any account, a visual simulation will be a priceless aid. For want of access to pertinent software like SketchUp, Revit or 3D Studio Max, I used what was easily available for me: Blender, that is a well-documented free and open source software. You do not need to become proficient in a 3D computer graphics software if you only want to use it for one project; some basics will probably do. But even then it is not just helpful, but also fun.
Next, I show you a random selection of my Blender renders. They are from various stages of my design process. I did those mostly to familiarize myself with the space shape that I designed. But as you can tell, there were also helping me in the long process of decision making about cabinet front products and about colors.


A story of demolition and reconstruction in 20 pictures
The works that are documented in the following images spanned over a time period of 15 weeks, even though, for various reasons, only a part of those days were actual construction work days. Because we were still living in the house and needed a makeshift kitchen during the construction, the northernmost part of the space, which required only very little work, was sectioned off and put behind a dust curtain.
-
 Sectioning off of several clean spaces (that were supposed to be kept habitable) behind dust curtain walls; removal of flooring
 -
 Demolition and removal of the old kitchen
 -
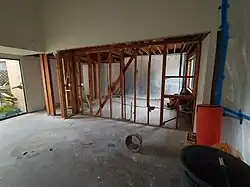
 Removal of dry wall and building insulation from the walls, removal of the old ceiling light installation
 -
 Removal of dry wall and building insulation from the ceiling and the suspended ceilings; removal of some wall studs; installation of a temporary support (right)
 -
 (The same, as seen from the living room)
 -
 (The same, as seen from the living room)
 -
 Removal of the rest of the needless wall studs. My happiest day, because I wanted that wall to be gone so badly!
 -
 (The same, as seen from within the kitchen)
 -
 Reconstruction and extension of the suspended ceiling (left); construction of a soffit (foreground); new electrical connections; modification of the water connections
 -
 Construction of two new walls (center, right)
 -
 Extension of the existing wall (foreground)
 -
 (The same, as seen from within the kitchen)
 -
 The soffit got a plywood case. More electrical and water connections; preparation work for the lighting
 -
 (The same, as seen from the living room)
 -
 Part of the ceiling needs to be suspended because it holds the ducts of our forced air heating system.
 -
 New building insulation, and a new window, too
 -
 (The same, as seen from a different angle)
 -
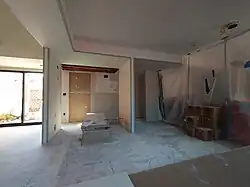
 New drywall, taped already
 -
 (The same, as seen from within the kitchen)
 -
 After drywall mudding, and already with some wall paint