How can I fade-in an object from being half-transparent to fully opaque? Basically the transparency animation under emphasis does the exact opposite of what I am trying to achieve, which makes an object transparent for emphasis (?). Initially I would like all objects to be 50% transparent and fade to be fully opaque one by one.
5 Answers
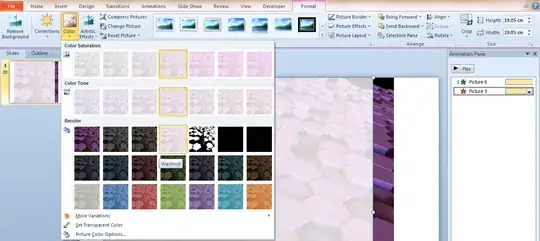
The only way I found to do this was to add two copies of the object. That is, first add the object (say an image), then add another copy of the same on top. Set the top copy to be ~50% transparent (if it's an autoshape then via Fill / Transparency, or if it's an image then via Color / Washout). Finally, set the opaque copy to Fade In, and the semi-transparent copy to Fade Out at the same time. The effect should hopefully be what you're looking for:
(You can see the effect in action here.)
- 57,289
At least in my Version of Powerpoint there is yet an even better alternative:
- Add the "transparent" animation from the "emphasis animation" group to all objects, texts, bullet points that you want to be initially transparent (set the transparency under effect options to whatever you like).
- Make these animations all be in group [0] so that the transparency is applied initially upon reaching that slide (set the animation starts to "With previous")
- Add a second transparent animation to all objects in the order of there appearance. Make them activate by clicking. (Adding a second animation can be done via "animations > advanced animation > add animation")
- Make those second transparent animations all having the effect of 0% transparency (like @KyleHeuton described in his answer).
You should end up with a slide that shows all objects you wanted transparent initially, with each object appearing opaque one after the other upon clicking the mouse button.
Some supporting screenshots
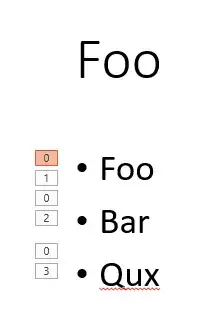
The slide with three bullet points showing the applied animations, as you can see there are two animations per bullet point: [0] and [i] with i being the i'th mouseclick.
The animation pane showing the three initial animations of "transparency" applied in group [0] to all three bullet points, and the three additional "transparency" animations for each individual bullet point upon clicking.
- 161
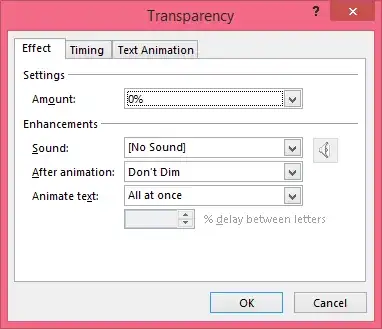
It is possible to do this by adding a new transparency animation and setting the transparency "Amount" to 0% in the effect options as shown below. The percentage here refers to "percent transparent", so 0% transparent would be opaque.
- 133
Since adding an additional transparency animation (to remove transparency) didn't work for me on PowerPoint 2010, here is my solution.
Create a white square (no outline) with transparency of the fill set to an appropriate amount to make the object underneath it appear how you wish, then make that white square "Appear" when you need the transparency, and "Disappear" when you want the transparency to be removed.
- 487
There is a significantly easier way. Go to Effect Options > Timing > Duration and set it to "Until Next Click" or whatever timing you desire.
- 1


