87

My question is: How to set up file sharing correctly, in a home network, with Windows 8/10, so sharing any folder with "Everyone" (File Explorer->Right click on folder->Properties->Sharing->AdvancedSharing->Share this folder) actually shares the folder with everyone, without password, even with Microsoft accounts?

Before you answer, please read on, because the trivial solution does not work if Microsoft accounts are involved.

I have a home network, with Windows 8.1 and Windows 10 machines, all in the same Workgroup. No Homegroup. I want to be able to share individual folders on the network, by setting them to shared through File Explorer. In Windows 7 and Vista, I just go to Network and Sharing Center, enable file and printer sharing, disable password protected sharing, and it all works. In Windows 10 and Windows 8, the same still works, but only if both machines use local accounts. As soon as one of the machines - either the one accessing the files or the one sharing them - uses a Microsoft account, it is no longer possible to access any files or folders on the other machines. Specifically, if the machine with the Microsoft account tries to access the machine with the local account, it will prompt for a username and password, and access will fail unless username and password of an actual user on the target machine are provided. Changing the Microsoft account to a local account immediately fixes the problem, with no other configuration changes.

This problem is real, and I've reproduced it on several machines, had friends encounter the same problem, and I've found several reports of other users with the same issue, but no solution. The problem seems to be the same in Windows 8 and in Windows 10.

Successfully implemented workarounds (not solutions):

  1. Store the usernames/passwords to the other machines in the Credential Manager and give up the idea of sharing without password. Best use a common account for access*.
  2. Don't use Microsoft accounts.
Peter
  • 4,630

3 Answers3

49

I managed to share folders without passwords in Windows 10 with Microsoft Accounts by following this guide: http://www.howtogeek.com/126214/how-to-create-network-file-shares-with-no-passwords-in-windows-8/

I publish here in order to prevent link rot:

  1. Open Network and Sharing Center
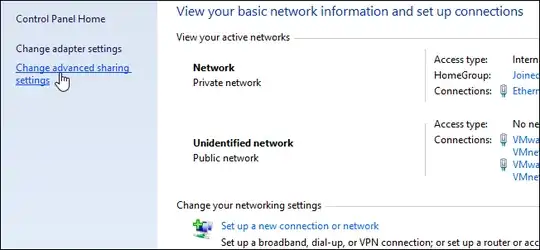
  2. Then click on the Change advanced sharing settings Link in the left hand panel. screenshot
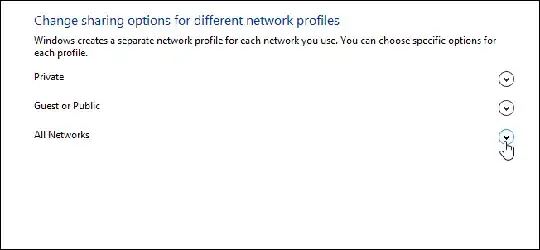
  3. Now expand the All Networks section. screenshot
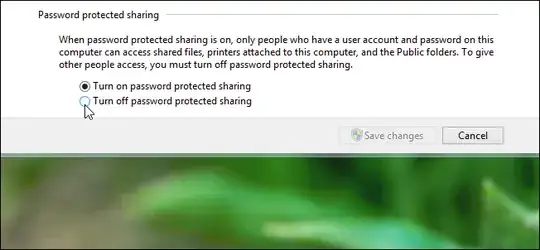
  4. Finally switch the radial button to the Turn off password protected sharing setting and click Save changes. screenshot
  5. It works!

I did not try this extensively (for example if you need to have a password protected share instead), as all the shares in my LAN don't need to be password protected, and since there's no wifi, I know that i'm the only one to access the share. But I think, if it disable all the passwords, it will still work with NTFS access permissions

Magnetic_dud
  • 3,702
23

To explain the problem :

On Window 8.1, and presumably Windows 8, when using a Microsoft account to login to Windows, the default user-name when you make a network connection is MicrosoftAccount\<live_id_username>, instead of the login <computer_name>\<username> as in previous versions of Windows.

This MicrosoftAccount form is likely to cause a login failure on any server that is not using a Microsoft account, due to the strict way that Microsoft/Local accounts are implemented in Windows 8/8.1.

I have not been able to find a way of forcing Windows 8/8.1 to use the old format of computer-name\user-name, unless with one of the workarounds you have listed in your post. Probably this problem needs to be addressed by Microsoft itself.

I have tested and this is still true in Windows 10, so don't expect any improvement. Unfortunately, this is just the way that Microsoft/Local accounts were implemented.

xarlymg89
  • 123
harrymc
  • 498,455
2

I am able to use a share over 2 PCs with Windows 10 v22H2 here.

Main PC creates the share, using a local administrative account:

  • Right click on the folder to share, Properties -> Share tab -> Advanced sharing... button.
  • Tick the Share this folder mark, then set the Share name, optionally enter a comment
  • Press the Permissions button, then tick the checkmark on Full control for the Everyone group.
  • Now go to the Security tab and press the Modify... button
  • Press Add..., then type Everyone on the next window and press OK
  • Tick the Full control checkmark on the Permissions for Everyone groupbox on the bottom

Bonus steps to allow access to a secondary PC running Windows 11 23H2:

  • Right click on the folder to share, choose Give access to -> Specific people...
  • In the window that appears, type Everyone, then choose Everyone from the drop-down and press the Add button
  • On the Everyone row, Authorization level column, select Read/Write
  • Press the Share button on the bottom-right to confirm and close the window

The next steps could be needing a Windows 10 Pro license to access the Administrative Tools:

  • Press Start, type secpol.msc and press Enter (or go to Control Panel -> Administrative Tools (Windows 10) / Windows Tools (Windows 11) -> Local security Policy)
  • On Local Policies -> User Rights Assignment -> Deny acces to this computer from the network: Remove Guest
  • On Security Options -> Network access: Shares that can be accessed anonymously: Enter the share name here, exactly the same as you set in the Advanced Sharing -> Share name (NOTE: I don't know what needs to be done for multiple shares, I have a single share with public access)
  • On Security Options -> Accounts: Guest account status: Activated

Secondary PC accesses the share:

Open Explorer -> Network. Some seconds and the main PC appears, I double click on it, I see the share, double click on it and I enter it without entering any credentials. This both using a local account and a Microsoft account.

It may be that you'll need to enable network file sharing: in that case, a warning should appear on the top of the File Explorer window. You may also need to move the current network to a private one.

I think that's all. I installed Windows 10 v22H2 on both computers a couple of weeks ago, so any other setting should be to the default set by the Windows 10 installation. During the installation I removed the network cable, so I completed the installation using a local account. Feel free to ask in the comments any other setting, should this guide not work for you.

Update 2023/05/18: I added the steps on the primary computer to share the same folder with a new, freshly installed Windows 11 23H2 computer, and I can also access the same share with that computer, too

Some of the sources:

gog
  • 163